Manual or Aperture Priority?

This is a re-post. This article was published February 2020. I’m going to re-publish articles from my extensive blog as I think many of them are still relevant.

This article deals with using Aperture Priority along with grads to work out your best exposures. I’m aware that many use manual, but if you read below, you may see why I think AP is a good mode to work in.

Each year I get participants using Manual mode for almost everything they do. Today I’d like to cover why for me I would tend to use Aperture priority (along with exposure compensation) for most of my work. The only caveat about this is that when you get into very low light situations, most cameras prefer to work in Manual. They somehow fail to be able to give sensible readings in AE.

My main reason for using Aperture Priority above anything else is mainly due to this:

‘when using grads along side aperture-priority,
the camera automatically re-balances the exposure’

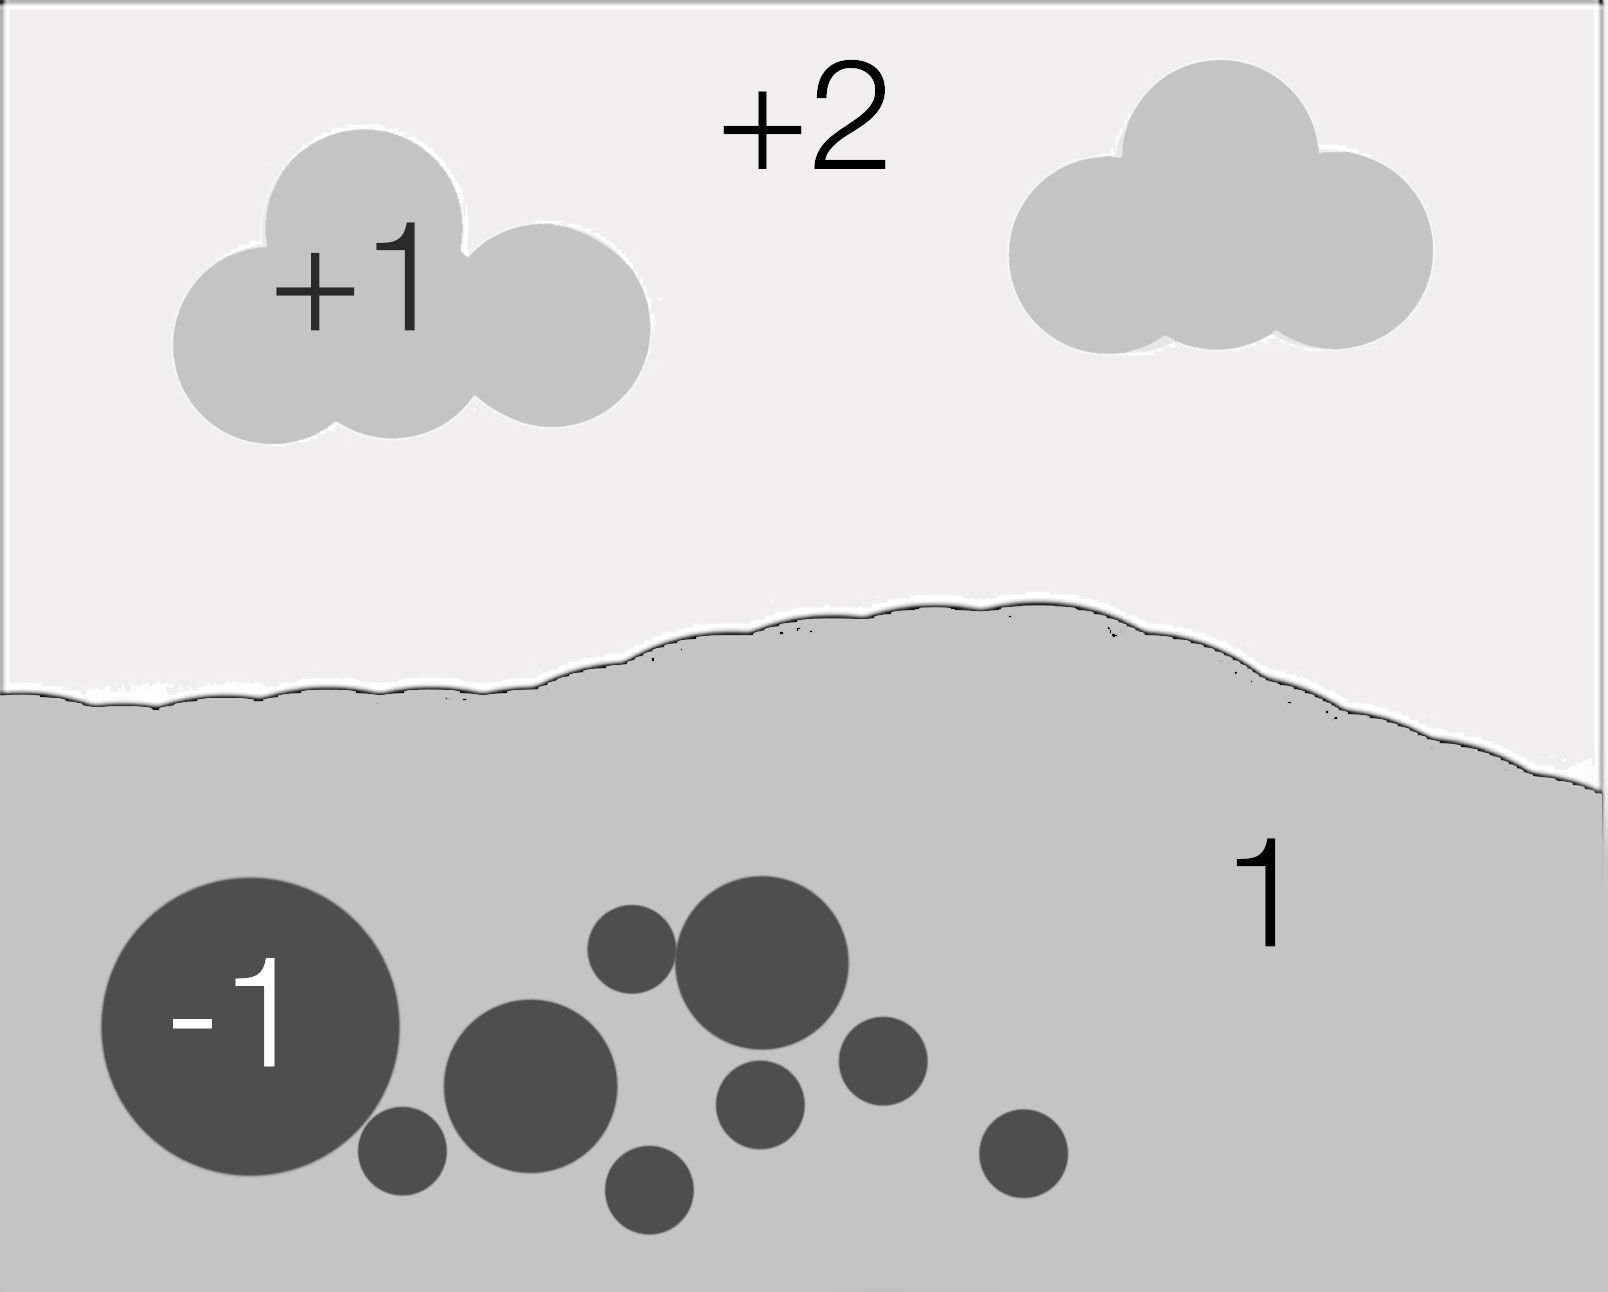
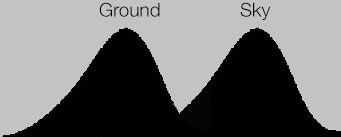
Consider the diagram below. On the left I show how the exposure of sky (blue) and ground (green) are worked out. Bear in mind that the light meter inside your camera just sums up all the tonal differences and takes an average (if you’re not clear on metering, see the previous article Light meters are dumb, they just try to turn everything 18% Grey).

exposure-grads.jpg

The main point about this diagram is:

  1. Before applying a grad, the camera just has to take an average between sky and ground. So the ground is underexposed and the sky is over exposed.

  2. When applying the correct strength of grad, the sky gets darker (as we have been taught - this is what grads do - they darken the sky). But something else happens as well………

The ‘something else that happen as well’ is this:

  1. The ground gets lighter.

Why is this? Well if you study the diagram, and think about it for a little bit, you can quickly see that if you apply a grad, the difference in stops between the sky and ground is reduced. Since the camera’s light meter is looking for an average, the new mid-point is much less further away from the sky and ground tones. In other words, the contrast range has been reduced and the light meter just picks a new average between the new light and dark tones.

When working in Aperture priority, the average exposure is being computed in real time. You can even see it adjusting the mid-point exposure as you push a dark grad down on the frame. As you do so, the ground gets lighter, because the difference between sky and ground is reduced.

This doesn’t happen in Manual. You don’t give the camera a chance to automatically re-balance the exposure for you.

Manual isn’t always the way to go

For me, I would shoot in Aperture Priority for most of my work. I’d prefer to do this because each time I apply a grad, the camera just recomputes, and works out the new average meter reading for the scene.

Before I am shot to bits by people declaring that I think Manual mode is bad. I’d like to make very clear that Manual still has its place. Often times when working in very low light, most cameras give up metering in Aperture priority, and so I have to resort to using Manual for these times.

It’s just that in Manual, you don’t see the ground lifting up in value when applying the grads. So I prefer to use Aperture Priority when I can.

Aperture Priority + Exposure Compensation

If it were me, all cameras would be designed to have just these three elements:

Aperture Priority
Exposure Compensation
Manual mode

Because most of the time, aperture priority with a bit of exposure compensation is all that’s required. Sometimes I need to go longer than 30 seconds, or need to set up the camera is very low light, so I’ll resort to Manual.

Grads are still valid

If you’re a digital shooter that believes you don’t need grads, I’d like to urge you to think again. There are many benefits of working with grads:

  1. As pointed out above, when you use a grad to darken the sky, you also lift the tonal values in the ground.

  2. You get more shadow information in the ground

  3. The negative you come home with is more pleasing to work with. It requires less effort in processing to figure out if it’s any good to begin with

  4. Working with nicely exposed negatives is much more inspiring that working with negatives that need a lot of massaging in post.

  5. Are you really going to process ALL of your digital files to see if they turned out well? I doubt it. How can you tell if the image is any good when the sky is bleached out and the ground is muddy?

For me, points 1, 2 and 4 are perhaps the most important for me.

The Benefits of seeing Upside Down

I’m in Turkey this week with my view camera - I own an Ebony SW23 medium-format film view camera. Whilst looking through my older entries in my blog (which I recommend you doing sometime, as there’s now quite a lot of information here as I’ve been writing it for over 10 years), I found this article. Which I felt I would like to re-post today.

—-

Originally posted on May 5th, 2014

A few months ago, I re-entered the world of the view camera. It was a decision based on a few things.

Firstly, I'd been finding that I needed perspective control over some of the landscapes I've started to shoot over the past year. Buildings, and tall features in nature were causing me issues where I felt that the subjects began to lean backwards or converge together. Using a camera (or lens) with perspective control would alleviate that issue.

Upside down, and right way up

Upside down, and right way up

However, one of the challenges of using a view camera is that of composing upside down. I've found that rather than it being a hindrance, it has been beneficial in teaching me to notice things in the frame that I wouldn't ordinarily see at the point of capture.

One aspect of the human visual system, is that once we learn what an object looks like, we tend to keep it for reference point later on. This happens with everything that we see in our daily encounters. For example, when learning to read, once we know what some particular words look like, we no longer actually 'read' them (in my mind, this is tantamount to not seeing them). We simply scan past them. Take this sentence for example. Try counting the number of 'F's in it (please count it once):

FINISHED FILES ARE THE RESULT OF YEARS OF SCIENTIFIC STUDY COMBINED WITH THE EXPERIENCE OF YEARS.

How many 'F's did you count? Most folks tend to count three. There are actually six. The reason why you probably got somewhere around three, is because your mind has learned to 'scan' words such as 'OF' - you don't actually read them. Instead, your brain passes over them because it learned many moons ago that it's really laborious to read words like this all the time.

Another example to consider is that of a room you know so well. Once the ornaments and furniture have been in place for a while, you tend to pass over them with your eye. But if someone comes in and re-arranges something, or changes something, you'll more than likely pick up on the change when you enter the room. Rather than having to 'see' everything, as if for the first time, each time you enter the room (which would be really exhausting on your visual system), your eye tends to pass over familiar objects.

Now, photography is really the art of being able to enjoy the subtleties and nuances of familiar objects. Like taking a still-life art class, where we are asked to look at a vase of flowers and draw it, the act of making pictures is really about noticing the details of things we take for granted.

In terms of photographic composition, when we see a objects we are familiar with, such as trees and mountains, we tend to pass over them quickly. This leads to issues where we don't notice compositional errors in our pictures until we are home staring at them on our screens.

But what if the image is turned upside down? Do you still pass over the tree in the frame below, or is your mind thrown into a state of trying to work out what the object is?

Upside Down & right way up (again)

Upside Down & right way up (again)

Turning an image upside down breaks our ability to pass over items within the frame easily. In an attempt to understand what we are seeing, we pay more attention to the shapes and tones of the items within the frame. Looking at the two examples on this page, I would like to suggest that when you see the upside down image, this is exactly what is happening in your brain. But when you look at the image the right-way-up, you're now back to scanning familiar objects such as trees, mountains, sky, etc.

So turning an image upside down allows us to abstract the composition down into form and tone.

I guess you may be asking - well how can I use this, if I don't have a view camera like Bruces? I'll let you into a secret - I don't just use this feature with my view-camera - I also use it when I'm editing images at home in Photoshop. It's hugely beneficial to rotate my images 180 degrees - because it allows me to notice flaws in the composition, or to see things that I wouldn't notice otherwise. The interesting thing about this is that once you correct the things you're not consciously aware of, the compositions tend to become much more relaxed and easier for your brain to take in.

So if your camera has the facility to turn your preview image upside down - it might be worth using it from time to time. Set up your composition and then flip the image 180 degrees to look at the frame and see if anything you didn't notice before pops out at you. Additionally, it's worth doing the same exercise with an image once back home and behind your computer screen.

Turning your images 180 degrees is a bit like having a workout for your visual-muscle. Perhaps it's something you might like to consider whilst out in the field, or at the very least, once back home and editing your work.

Film Lab Recommendation

I can recommend 'AG Photolab - https://www.onlandscape.co.uk'

I've chosen to write this post today, to help other film photographers. If you are having problems getting good processing done, then I can recommend AG Photolab here in the UK. I'm not doing this because I have any business or financial interest in AG Photolab, and they haven't asked me to write a review either. I am just doing this because I receive emails all the time asking me where i get my processing done, and I have been using this company now for around 5 years, so I feel I have sufficient experience with them to recommend them.

All my films have been processed by AG Photolab since 2014.

All my films have been processed by AG Photolab since 2014.

I often receive emails from film photographers asking me if I can recommend a processing lab for them. The short story is that good quality processing is becoming harder to come by. Film sales are up, but lab experience is down.

About 5 years ago, I began to notice that many labs weren't producing good results for me and it was becoming a lottery as to what would happen if I sent my films in. I had many films ruined by bad processing. 

This wasn't good enough and so I started to hunt around and ask people for advice. I'm glad I talked to Tim Parkin from On-Landscape magazine as he put me in touch with Matthew Wells company 'AG Photolab' in Birmingham.

I have been using AG Photolab now for around 5 years. The processing has been consistently perfect. No steaks, no strange artefacts in the processing. When I have contacted them about altering my order, or perhaps cutting the films into sections of 3 (for my film scanner tray) they have been very responsive also.

But it's the quality of the processing that has made me stick with them, that and also Matthew Wells (the owner) dedication towards analog film and processing. I've had may conversations with Matthew on the telephone where it's been very clear he is passionate about doing the best processing he can, and has helped me on many occasion with my enquiries.

I know that they can deal with your film processing from overseas if you choose to ship to them. But I would definitely say that if you do - you need to be patient. I find it takes around two weeks to get my films processed and delivered back to me. I take great comfort in this: they have repeatedly stated to me that the reason why it takes so long, is that they don't want to rush things and that they realise that the most important thing to make sure that they keep the quality high.

Should you choose to send film to AG Photolab, I should let you know that they are great at keeping you updated:

1) the first thing that happens is you receive an email from them saying that your films have been received.
2) another email when the films are now being processed
3) and another email when the films are being shipped
4) depending on the carrier you choose, you also get updates on the tracking and where your film is!

Everyone's experiences vary, but I have been recommending AG Photolab to those who ask because they've given me consistency to my processing. Matthew Wells has told me that they often use my transparencies as an example to show other customers because, as he says so himself 'you have a lot of negative space in your images, and that is where you can really see any errors in the processing'. 

AG Photolab - http://www.ag-photolab.co.uk

Hit Rate doesn't matter

A good friend of mine recently asked me how many good images I shoot on a roll of film.

I can fully appreciate that it's just very interesting to know how often a photographer reaches success with his images - it might give an indication to the skill of the photographer, but it might not.

In my own case, I shoot a lot. And I'm very selective about what gets published. 

Borax field, Bolivian Altiplano, © Bruce Percy 2017

Borax field, Bolivian Altiplano, © Bruce Percy 2017

I don't think we should focus too much on how successful we are. Simply because I believe that experimentation is an important ingredient in the creative process and by definition, experimentation means being open to trying different things without fear of failure.

Let's consider that experimentation actually means. If you are experimenting, it means you don't quite know what the outcome will be like. This means that it could be somewhere between two extreme possibilities: a success or a failure. There's too much emphasis on failure being a bad thing. I think failure is a positive thing because you have to find out what you don't want to figure out where you need to go.

Indeed, I find that when I look back at my rolls of films, each roll is a chronological record of me working a scene. Take the transparencies shown below. There are four strips from one roll all laid out from start to finish from left to right. You can see that as the shoot proceeded I went from sunset to twilight.

If we analyse what I was doing, I think the roll of film breaks down to two major compositions. The first composition is using the peak of a volcano as a black triangle on the ridge of a borax field (it's not snow - this was shot in Bolivia). You can see I try the volcano peak on the right side of the frame at different focal lengths (it's bigger in the first shot and smaller in the next two). I then settle for the volcano peak on the left side of the frame. 

The 2nd composition is really about the black hillside in the distance. Again you can see I place the black hill in the background on different sides of the frame.

There is a theme going on with both compositions: I'm using a stark black object to frame against the white borax - these images are exploiting the tonal difference between black volcanos and hills against white borax.

A roll of processed 120 Velvia film, showing you the chronological sequence that the images were shot in.

A roll of processed 120 Velvia film, showing you the chronological sequence that the images were shot in.

The other thing to notice is that I am doing small shifts in the image sequence - changing the foreground slightly or using a different focal length to make the small volcano bigger in the frame.

I like to explore a scene, and take different compositions with different focal lengths. On the surface it may seem as if I'm making the same photo again and again, but I'm really looking for a perfect scene and this is the most important point: I have given myself permission to experiment.

When it comes down to the final edit, I think there are perhaps two images in this roll of film that I will compete and be happy with. I don't view the others as wastage of film, or failures: everything I've shot contributes to the final result. Consider them prototypes, or whatever, they all contribute to where I finally end up.

So with that in mind, I think 'hit-rate' is rather unimportant.

Shoot when you feel you need to shoot, consider if you are changing anything in the composition each time you click the shutter rather than just endlessly repeating the same shot, think about what might make the image stronger or weaker if you change something.

Borax field, Bolivian Altiplano, © Bruce Percy 2017

Borax field, Bolivian Altiplano, © Bruce Percy 2017

I think I am always shooting variations on a theme. Once I find my main composition, I will take around four or even an entire roll of film working the scene, experimenting, because I can't be a good judge of what I've shot until I get home, I'd therefore like to try out as many possibilities as I can. And that means discarding the thought of how many successful images I've made. It's really quite irrelevant.

Keep on experimenting and being open to trying new things. By it's very definition, experimentation means you don't really know the outcome of what you're doing. To truly experiment you have to be open to failure, because if you aren't open to failure, then you aren't experimenting. If you aren't experimenting, then you aren't growing.

Reciprocity Chart for Fuji Velvia 50 RVP

It's been a while since I wrote about this, and I've had a few people contact me about it. It seems that my original posting had lost some of the charts for reciprocity with Fuji Velvia, so I'm re-posting it here.

One of my most favourite things to do with landscapes is to collapse many moments in time into one frame. In other words, do long exposures. It can be extremely useful at removing textural detail that I don't need in the photo, as in the example below:

Removing textural detail by use of Long exposureFjallabak, IcelandImage © Bruce Percy 2017

Removing textural detail by use of Long exposure
Fjallabak, Iceland
Image © Bruce Percy 2017

By removing any small currents in the water, I've removed any possibility of the eye being distracted and therefore drawn to it. Similarly the long exposure has reduced the chance of the sky having anything of distraction in it either. So my eye is allowed to go straight to the headland. 

Using long exposures in this way can remove distractions and allow (in this case) areas of the picture to become 'wallpaper' - regions where your eye just floats over the surface. 'Wallpaper' is an integral component of most photographs: there are always going to be areas of the picture where you wish for the viewers eye to float freely without getting trapped or stuck.

By smoothening any textural details out of these regions of the frame, I can also allow the viewer to see the gradual tonal shifts that underpin the area. For instance, if you look at the water, the tones get darker as we move towards the bottom of the frame and the eye enjoys seeing smooth gradual shifts.

Similarly with the sky I've adopted the same approach, which is perhaps a point on its own: if you have clouds, do you need them? Often I'm wishing for skies with either complete cloud cover (for softer light all-round), or to reduce textural detail in the frame. I will deliberately go to certain places at certain times of the year because the skies are clear of clouds (Bolivia for instance) otherwise there is perhaps too much information or 'things' for the viewers eye to get stuck at. We're back to talking about tones and form. Too much form and we have too much distraction. So I'll often use a long shutter speed to smoothen out the clouds in the sky.

If you're a film shooter - which there is a good chance you might be in 2017, since I've begun to notice over the past few years that around 2 people in every group of 6 is a hybrid shooter (film and digital), then doing long exposures require the need to calculate reciprocity.

Just in case you don't know what reciprocity is, I'll explain. When shooting film, most folk think that the relationship between the shutter and aperture remain constant. They don't. As you get down to longer exposures, film loses it's sensitivity; and the relationship between the shutter speed and aperture begin to drift apart. Typically once you get past 4 seconds with Velvia. Which means that if you rely on your meter, you're going to underexpose your images. So you need to compensate.

I didn't use a long shutter speed here. It was a very calm evening and the only possible textural distraction would have been in the reflections of the mountains. I felt using a long shutter speed was a case of diminishing returns: not required. So …

I didn't use a long shutter speed here. It was a very calm evening and the only possible textural distraction would have been in the reflections of the mountains. I felt using a long shutter speed was a case of diminishing returns: not required. So rather than use long shutter speeds all the time to smoothen things down, get used to 'reading' your landscapes - watch them to see how dynamic they are.

It's very easy to get into the realm of long shutter speeds if you are shooting in low light or with some ND filters applied. With Velvia, if your meter tells you the exposure should be 4 seconds and beyond, then reciprocity needs to be applied.

Here is a table of corrected values:

4s becomes 5s
8s becomes 12s
16s becomes 28s
30s becomes 1 minutes 6s
1 minute becomes 2 minutes 30 seconds
2 minutes becomes 4 minutes, 50 seconds

And you shouldn't need to go beyond that, as the contrast will get too high and the colours too funky.

Either write them down, or better - remember them. I used to have them on a little laminated card for the first few years of shooting, but the corrections have now been memorised. That's one of the beauties of staying with a single film type for most of my photography career. The less variables I have to my 'process' the more second-nature things become.

Working out exposure for transparency film

 I was asked if I'd write a blog entry about how I work out my exposures. Bear in mind this is just my own take on it, and although it works for me, there are many other ways of doing this. So I'm not suggesting this is the only way, or the correct way, but it works for me. Also, before I begin, please know that I am 100% a film shooter. This is how I work out my exposures for Fuji Velvia film only (it's the only transparency film stock I use).

Velvia 50 transparences on my light table.

Velvia 50 transparences on my light table.

So here goes. Before I discuss exposures, let's do a bit of ground work and cover some basics. Here we go:

  • When you add 1 stop of exposure, you double the amount of light hitting the sensor / film.
  • When you subtract 1 stop of exposure, you half the amount of light hitting the sensor / film.
  • Therefore, exposure is a case of doubling or halving values.
  • Ansel Adams had the zone system (10 zones) which mapped to 10 stops.
  • With Velvia transparency film, the latitude of the film is only maybe around 3 to 5 stops. In those 3 or 5 stops you get 10 zones. So the way I work it out, is I assume that Velvia has a latitude of 3 stops, and that means I roughly allocate three zones of Ansel's system to one stop. I've never found that adding +3 stops to make snow white has every worked for me. It's always a case of adding +1 stop only.

I've constructed a simplified diagram below of a landscape. In it, we have the ground (I've chosen to use this as my  exposure point (18% mid grey) and therefore it has zero stop difference. Everything else in the diagram has it's difference in stops detailed - in comparison to the ground. In effect, the ground is our 'reference' point for everything else in the scene. This is pretty much what I do most of the time - assume my ground wants to be exposed at 18% grey, and work out where everything else is in relation to that, and also how much grad I will require to ensure the sky does not blow out.

About metering - 18% Grey

With metering, you should also know that the reading you get, is what it takes to make whatever you measured mid-grey (18%). Meter a white door and the reading you get is what it will take to turn that white door mid-grey. Meter a black door, and the meter will tell you what it takes to turn that black door mid-grey. So whatever you point the meter at - it's telling what exposure you need to turn the subject mid-grey, and you need to apply a degree of compensation to it to make it turn out how you think it looks.

For example, if I want a white door to be white, I will apply +1 stop exposure compensation (with Velvia, that's sort of like zone 8 in Ansel's terms). To turn the black door black, I will need to underexpose by -1 stop (turning zone 5 into zone 2).

Spot Metering a Scene

In the following illustration, I've broken down a scene into it's exposure components by stops.

Scene as is, before doing anything.

Scene as is, before doing anything.

In it, I have:

Ground, used to set the exposure so there is zero stops difference here.
Sky +3 stops brighter than the ground
Clouds +2 stops brighter then the ground
Black rocks -2 stops darker than the ground.

Grading the Sky to similar luminance as ground

I've worked out that I want the clouds to appear the same tone as the ground, so I'm going to grad the whole sky by -2 stops, therefore reducing the clouds to the same luminance as the ground, and also reducing everything in the sky by 2:

After applying a 2-stop grad

After applying a 2-stop grad

In the above diagram I have graded the sky by 2 stops. The white areas of the sky are still at +1 compared to the ground and that is fine with me, as I know Velvia can handle this. 

Where to set the mid-tone?

But what you should be asking yourself is whether setting the exposure for the scene on the ground values is correct. Depending on the luminance of the ground, I may wish to apply some exposure compensation to render the ground the way I perceive it.

Bear in mind that when taking a reading, you are asking the meter to tell you what exposure setting to use to turn the subject 18% grey. I've found that the following ground conditions require different amounts of compensation:

  • Sand (+1 exposure compensation)

Although it looks grey in colour or may appear mid-grey, Sand is actually brighter than 18% grey so if I meter sand and want it to come out the way I see it, I have to apply +1 stop exposure compensation.

  • Grass ( 0 exposure compensation)

Grass is 18% grey, so metering it gives me the correct value to render it the way I see it.

  • Stones (+1 exposure compensation to -1 exposure compensation)

Stones vary in luminance. Black stones need to be rendered at -1 exposure compensation while most 'mid-grey' stones require +1. We tend to perceive brighter objects as less bright. So a stone that is brighter than 18% grey is often perceived as 18% mid grey when it's not.

So to set the exposure on my scene, I really need to consider the luminance values of the ground, and I will often use grass as a correct reference point, but if there isn't any available, I know that sand will require +1 exposure compensation.

Applying +1 exposure compensation. Everything is transposed +1 stop

Applying +1 exposure compensation. Everything is transposed +1 stop

In the above diagram I've applied +1 exposure compensation, which means the entire scene has been brightened. This means that the ground is +1 over 18% grey, and the black rocks in the foreground are now -1 stop below 18% grey. The sky is +2 stops over mid-grey which is fine as i know Velvia has enough latitude to record this.

Re-balancing the scene - applying different graduation

However, I'm now thinking that since I have:

  1. Applied a 2 stop grad
  2. Applied +1 exposure compensation

The grad is not as effective as I would like it to be. Pushing the exposure +1 has reduced the strength of the grad from 2 stops to 1, from where we started. So I'm going to take out the 2 stop grad and replace it with a 3 stop grad:

Replacing the 2 stop grad for a 3 stop grad.

Replacing the 2 stop grad for a 3 stop grad.

So I've left the ground exposure untouched. It is still at +1 exposure compensation, but i have brought the luminance of the sky down by a further stop so it is now -3 from its original position. But bear in mind although it is graded 3 stops, I have applied exposure compensation to the entire scene of +1 which means the grad is only really reducing by 2 stops (-3 stops +1  = -2 stops).

Before and After

So let's now compare what we started with, and where we needed up. In the two diagrams below, I do just that:

Initial scene with exposure set to the ground.

Initial scene with exposure set to the ground.

Final exposure with 3 stop grad applied and +1 exposure compensation applied to whole scene.

Final exposure with 3 stop grad applied and +1 exposure compensation applied to whole scene.

A word about histograms and exposure

Before we begin to look at the difference between the initial exposure and the final one, we must first consider how the human eye sees tones.

In a nutshell: we perceive every tone out there as a mid tone. To test this out, if you point your camera at the ground so it fils the entire area of the image and take a shot, the ground should look correctly exposed. The histogram will show you an exposure right in the middle, which suggests we perceive the ground as an 18% tone. Now do the same for the sky - point the camera completely up into the sky and take a picture. It too will look correct even though the histogram is in the middle and the sky is now 18% grey.

We perceive everything more or less as sitting in the middle of the tonal range. In fact, human vision is incapable of seeing true luminosity and we tend to compress the higher tones so we see the same thing.

When I am making exposures, I am attempting to move the ground towards the mid-tones of the histogram and I am trying to move the sky towards the mid-tones of the histogram too.

This is very important and I would read this again:

"When I am making exposures, I am attempting to move the ground towards the mid-tones of the histogram and I am trying to move the sky towards the mid-tones of the histogram too."

If we look at the scene after I've applied my 3 stop grad and added +1 exposure compensation, this is exactly what I've done: I've lifted the tones in the ground by +1 stop and reduced the sky tones by -2 stops. This can be seen in the following histograms:

Original exposure with no grad or exposure compensation applied. Ground is underexposed, Sky is overexposed.

Original exposure with no grad or exposure compensation applied. Ground is underexposed, Sky is overexposed.

After applying a 3 stop grad and adding +1 exposure compensation, I've brought the ground and sky tones towards the middle.

After applying a 3 stop grad and adding +1 exposure compensation, I've brought the ground and sky tones towards the middle.

The histogram on the right is what we should be aiming for. This is for a few reasons:

1) The ground has been moved towards the mid tones
2) The sky has been moved towards the mid tones
3) The scene is now 'balanced' and looks like what we see with our own eyes

But also, here are a few important things to consider that you get with your histogram on the right, which you lose with the histogram on the left:

1) You open up the shadow detail. There's more tonal information in the shadows
2) You open up the highlight detail. There's more room for the brighter tones to stretch out across the histogram.

When you don't do this, and end up with a histogram as you see on the left (I call it a double humper), you get the following problems:

1) You lose shadow detail because all your lower tones are squashed into the bottom left of the histogram and quantisation occurs - many tones become compressed into one single tone. You lose tonal detail and no amount of correction later on is going to recover that for you.
2) You lose highlight detail because all your higher tones are squashed into the top right side of the histogram.
3) You have to do more drastic editing when you return home and scan the films.

So when someone says 'I've got it all in the histogram', this may be OK for digital capture (well, it's not really), but for film it's not ideal at all. You still go home with an underexposed ground and an overexposed sky. Trying to recover shadow detail in film is a nightmare (and almost impossible with transparency film) and likewise turning down the overexposed sky brings out funky crossover effects and often I find the grain in the film becomes very evident due to drastic curves adjustments.

You need to balance the exposure in-camera. Even if you are a digital shooter this is still what you have to do and I don't subscribe to the idea that digital cameras have 12 stops of dynamic range so grads aren't required. They are still required for all the  reasons pointed out above.

To finish up

Working out exposures in the field for film using a spot meter may sound complicated, but it really isn't. It's just a case of practicing.

I love spot metering my scenes. I also love not seeing what I'm getting. Using film means I have to construct the image in my mind's eye. What I like about this approach, is that it has taught me to really think about what tones are present in the scene. Through practice, I now know that black rocks are hard to record, and that I really need to lift the tones in the ground up towards the mid-tone or above it, and reduce the sky down towards the mid. This is not simply because the dynamic range of my film is limited (it's is a concern, but not the main reason). The reason is that in order for the scene to be truly balanced the way my eye sees it, I need to move everything towards the middle of the histogram. That means reducing dynamic range and shifting the ground to the right and the sky to the left.

The simplified version

Ok, that was quite long, and perhaps quite difficult to take in. So here's a simplified version:

  1. Meter the foreground and then meter the sky and work out how many stops difference there is and apply a grad for those number of stops.
  2. If the foreground is brighter than 18% grey, apply +1 exposure compensation

Or....

  1. Work out the difference in stops between ground and sky and apply a grad for the difference.
  2. Make  two exposures. One with no exposure compensation and a second one with +1 exposure compensation applied.
  3. Go home and study the films.

Kodachrome Rumour

I'm always interested in just how viable it is to bring back older products. Last year we saw the Moog Minimoog synthesiser resurrected. It's something i never thought would happen, and it seems that some of the film companies are now starting to realise there is still value in their older discontinued product lines.

It's being rumoured on a few websites lately that the CEO of Kodak was quoted as saying:

"We get asked all the time by filmmakers and photographers alike, ‘are you gonna bring back some of these iconic film stocks like Kodachrome [and] Ektachrome,'” says Overman. “I will say, we are investigating Kodachrome, looking at what it would take to bring that back […] Ektachrome is a lot easier and faster to bring back to market […] but people love Kodak’s heritage products and I feel, personally, that we have a responsibility to deliver on that love."

It's a big 'if' right now, so don't read this as 'they will bring it back'. For me, it's simply inspiring to know that the film companies are looking back at their older products and realising they still have a lot to offer if resurrected.

Kodak Brings Back a Classic with EKTACHROME Film

Film is not dead. I've known this for a while because I looked into it a while back. Today is nice news to hear that Kodak is re-introducing Ektachrome film and is manufacturing it in their Rochester plant.

Since 2009, film sales have been on the rise. Indeed, it is not unusual for me to find maybe 1 or 2 people per workshop who is what I would call a 'hybrid' photographer or 'flexitographer'. Someone who now plays with analog mediums as well as digital.

This is a massive turn around from the usual question I got asked about 10 years ago of 'have you gone digital yet'. The way I see it is that we have certain behavioural patterns to embracing new things and I'd like to draw comparisons to music listening mediums.

Each time something new comes out, there used to be a terrific rush to adopt it. Bring in the new and throw out the old. Back in the 80's we had this notion that one format had to replace all others. Cassette tape and vinyl records were promptly abandoned by many for CD. Roll forward to the present time, and we are now living in a multi-format society where it's more a case of lifestyle choice whether you listen to your music digitally or via vinyl. In fact, we live in an interesting time where CD is now mostly obsolete and yet vinyl is alive and well (albeit selling in very very small quantities compared to other digital mediums).

So with regards to music listening, we've gone past the honeymoon period of embracing digital and abandoning analog listening mediums and now enjoy both.

The same can be said for photography. We have gone past the question of 'have you gone digital yet?' to perhaps asking questions such as - what else is out there that I can play with? And the answer is that many photographers are now enjoying working with other mediums such as traditional black and white printing, black and white film, colodian wet plate process, palladium printing, and of course digital capture.

It's an interesting time to be a photographer, because we have all these mediums at our disposal and it's heartening to know that many of us are experimenting and playing with them.

In Kodak's case with Ektachrome, I feel this rebirth of the film is more to do with the requirements and needs of the motion movie industry to have film for a few reasons: firstly, there is the need to archive. Digital is not the most safest way to do this and the more secure way is to have hard-copy. Always. So there is a desperate need from the motion picture houses to have film stock available so they can archive and keep their films for posterity. Secondly there is still a demand from certain film directors to shoot on film. There has been an active campaign for film to stay around.

From my own perspective, I think film is here to stay. But there is a problem with keeping it here. Currently with vinyl album production, most of it is being done on old pressing plant machines. The infrastructure to keep vinyl albums alive is based on dedicated people maintaining these older presses. Similarly, I think the biggest challenge to keep film production going is to maintain the lines and processing plants that make them. Re-tooling when things break down is problematic for large-scale existing plants, but surprisingly, it is not a problem for some of the newer films that are coming from cottage industry businesses.

Anyway, the upshot is that any 'scaremongering' about film being end of line product is simply that now. Film still has a future now that things have settled down a lot and we as creative people have more options at our disposal. It's a good time to be a photographer.

Light Table

Over the past five or six years, I've noticed a resurgence in analog photography. There is usually one or two participants on my workshops who now have a traditional black and white darkroom at home, or are a colour film shooter. Some are pin-hole shooters but most of them are hybrid photographers. They have digital and film and like to experiment with all the mediums now.

An A2 in size LED 'light pad' used as a photography light table.

An A2 in size LED 'light pad' used as a photography light table.

This I feel, is greatly refreshing to note. For a long while, I was always being asked 'have you gone digital yet?' and this question seems to have abated over the past while because we've gotten over that uncomfortable period when everyone feels they need to throw out the old for the new. It is no longer an either / or situation and we are now living in a period where photographers are embracing multiple formats, multiple systems and along with that, different mediums such as palladium printing, traditional black and white as well as C41 and E6 processing.

For a while, it was becoming harder to find things like a good light table. I have a beautiful one at home by Gepe. It has the same colour temperature as my monitor and daylight viewing booth, but I wanted a larger area - something around A2 to help me do an 'overall' review of images I've shot. I like to be able to see the bigger picture, to understand what kinds of images I've made on a shoot and how I think they may be edited together into some cohesive final portfolio.

I bought this A2 light pad, as it's called. It was pretty inexpensive for what it is (£70). It's great for helping me spread out several sheets of transparency roll films for review! I just love looking at transparencies on a light table - the scene comes alive for me but most importantly, it allows me to reconnect. I find my imagination is awakened and I can step back into the scenes I was photographing.

The downside about using an LED light table though, is that its colour temperature is far too 'cool'. Images can appear more blue or cold than they really are. The other issue, which is the most important one for me is that when I return back to my monitor the colour temperature shift is noticeable. My monitor appears to look rather yellow in comparison. It's not really. It's just that the LED is far too cold. 

So I bought a Cinegel #3409: Roscosun 1/4 CTO A2 sized colour correction gel filter to help reduce the coldness of the LED light table. It's exactly what I needed to bring my 'lighted' into line with the colour temperature of my monitor and daylight viewing booths.


Pitting your ego against the climate

Murray Fredericks reminds me of myself far too much. Whilst watching his 28 minute movie about photographing lake Eyre in Australia, I saw not only a landscape that is very close to what I have experienced on the salt flats of the Bolivian Alitplano, but also a photographer obsessed by the same thoughts that I often have during my trips to remote places.

Murray-Friedricks


I love large vast expanses of 'nothingness'.  I'm enthralled by the Salar de Uyuni salt flat of the Bolivian Altiplano in the same way that Murray is captivated by lake Eyre. You should definitely watch this movie. His images are absolutely worth waiting for the very end of the movie for.

I saw so many parallels with my own experiences whilst watching this movie.

For example, Murray notices that after a short while the exotic nature of his landscape tends to subside. This is something I've experienced and I tend to find I can only truly understand a place I've been to, once I'm back home. It seems that being home gives me a reference point, one where I can consider and notice the contrasts to where I have just been.

He also notices in his movie just how the smallest of noises like the sound of brushing his teeth seem to be amplified.  This also goes for his thoughts. He finds that it's all too easy to get stuck in some mad part of his brain and before he know it, he's digging himself into a downward spiral. I know this, because big empty spaces do this to you - they act as a massive reflective board that just bounces all the stuff that's going in in your mind right back at you.

You can't go somewhere where there is nothing to occupy your mind if you have issues. Issues just get amplified. I was speaking to a good friend of mine who lives in the Lofoten Islands and I was telling her about an american photographer that I know, who would love to move there. She said to me 'it's not for everyone, all this space and silence tend to amplify any issues that you have'. It seems that going somewhere with a lot of space doesn't give you a chance to run away from your problems - it just gives them a platform for them to stare right at you.

Murray also notices memories that surface - of people he hasn't known for years. I found this to be the case also. During my very first photographic outing to Iceland back in 2004, I spent a month in a tent, often for days on my own. I found this time to be extremely cathartic for me - it was a time in my life where I'd never had the luxury to have so much time to consider and reflect with no distractions. I felt I had a bit of a mental clear-out. I found my mind returning to thoughts of old school friends that I had lost touch with decades ago. It was surprising for me to find myself thinking about people I'd thought I'd forgotten about, and events that I didn't know I still had memories of. I considered later that these thoughts are always present, but they get buried under the noise of everyday life.

But the biggest message of this movie is this: you can't force things to go your way.

Murray says at one point that he wishes the landscape would cooperate with what he want's to get out of it and realises that all he's doing is pitting his ego against the climate.

So often I feel that as photographers, most of us turn up somewhere and try to 'will it' to be something that it's not and when it doesn't live up to our expectations, we become discouraged.

Photography is not about forcing things. Nor is it about deciding what it should be and discarding it if it doesn't conform to our wishes.

Photography is really the act of submission. It's about seeing the beauty in what's there and working with what you're given. You'll have more chance of capturing something if you're open to whatever comes your way, rather than hoping for something specific.

This is a really great short-film. I'll be watching it again and again, just for the philosophical observations. But if that's not for you, then watch it at least for the very stunning wondrous photographs towards the end.