I was asked if I'd write a blog entry about how I work out my exposures. Bear in mind this is just my own take on it, and although it works for me, there are many other ways of doing this. So I'm not suggesting this is the only way, or the correct way, but it works for me. Also, before I begin, please know that I am 100% a film shooter. This is how I work out my exposures for Fuji Velvia film only (it's the only transparency film stock I use).

Velvia 50 transparences on my light table.
So here goes. Before I discuss exposures, let's do a bit of ground work and cover some basics. Here we go:
- When you add 1 stop of exposure, you double the amount of light hitting the sensor / film.
- When you subtract 1 stop of exposure, you half the amount of light hitting the sensor / film.
- Therefore, exposure is a case of doubling or halving values.
- Ansel Adams had the zone system (10 zones) which mapped to 10 stops.
- With Velvia transparency film, the latitude of the film is only maybe around 3 to 5 stops. In those 3 or 5 stops you get 10 zones. So the way I work it out, is I assume that Velvia has a latitude of 3 stops, and that means I roughly allocate three zones of Ansel's system to one stop. I've never found that adding +3 stops to make snow white has every worked for me. It's always a case of adding +1 stop only.
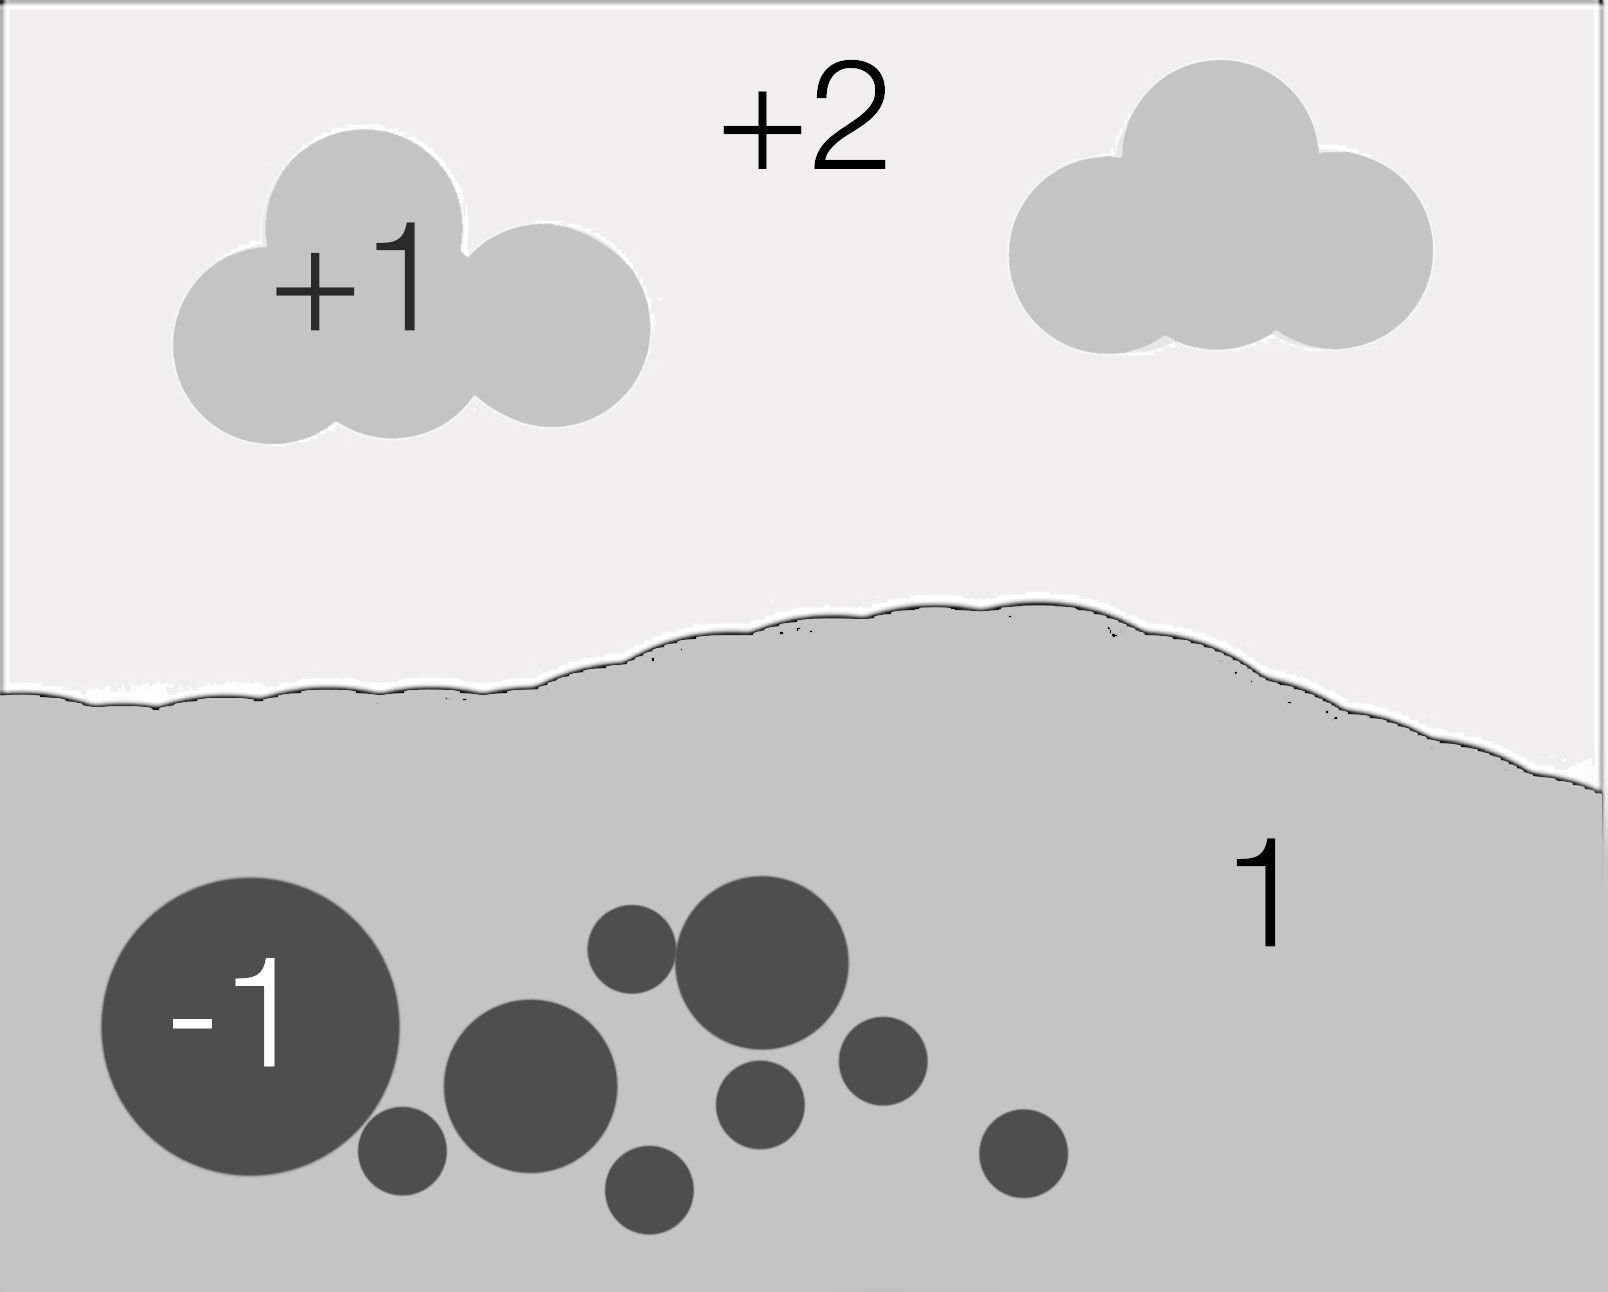
I've constructed a simplified diagram below of a landscape. In it, we have the ground (I've chosen to use this as my exposure point (18% mid grey) and therefore it has zero stop difference. Everything else in the diagram has it's difference in stops detailed - in comparison to the ground. In effect, the ground is our 'reference' point for everything else in the scene. This is pretty much what I do most of the time - assume my ground wants to be exposed at 18% grey, and work out where everything else is in relation to that, and also how much grad I will require to ensure the sky does not blow out.
About metering - 18% Grey
With metering, you should also know that the reading you get, is what it takes to make whatever you measured mid-grey (18%). Meter a white door and the reading you get is what it will take to turn that white door mid-grey. Meter a black door, and the meter will tell you what it takes to turn that black door mid-grey. So whatever you point the meter at - it's telling what exposure you need to turn the subject mid-grey, and you need to apply a degree of compensation to it to make it turn out how you think it looks.
For example, if I want a white door to be white, I will apply +1 stop exposure compensation (with Velvia, that's sort of like zone 8 in Ansel's terms). To turn the black door black, I will need to underexpose by -1 stop (turning zone 5 into zone 2).
Spot Metering a Scene
In the following illustration, I've broken down a scene into it's exposure components by stops.

Scene as is, before doing anything.
In it, I have:
Ground, used to set the exposure so there is zero stops difference here.
Sky +3 stops brighter than the ground
Clouds +2 stops brighter then the ground
Black rocks -2 stops darker than the ground.
Grading the Sky to similar luminance as ground
I've worked out that I want the clouds to appear the same tone as the ground, so I'm going to grad the whole sky by -2 stops, therefore reducing the clouds to the same luminance as the ground, and also reducing everything in the sky by 2:

After applying a 2-stop grad
In the above diagram I have graded the sky by 2 stops. The white areas of the sky are still at +1 compared to the ground and that is fine with me, as I know Velvia can handle this.
Where to set the mid-tone?
But what you should be asking yourself is whether setting the exposure for the scene on the ground values is correct. Depending on the luminance of the ground, I may wish to apply some exposure compensation to render the ground the way I perceive it.
Bear in mind that when taking a reading, you are asking the meter to tell you what exposure setting to use to turn the subject 18% grey. I've found that the following ground conditions require different amounts of compensation:
- Sand (+1 exposure compensation)
Although it looks grey in colour or may appear mid-grey, Sand is actually brighter than 18% grey so if I meter sand and want it to come out the way I see it, I have to apply +1 stop exposure compensation.
- Grass ( 0 exposure compensation)
Grass is 18% grey, so metering it gives me the correct value to render it the way I see it.
- Stones (+1 exposure compensation to -1 exposure compensation)
Stones vary in luminance. Black stones need to be rendered at -1 exposure compensation while most 'mid-grey' stones require +1. We tend to perceive brighter objects as less bright. So a stone that is brighter than 18% grey is often perceived as 18% mid grey when it's not.
So to set the exposure on my scene, I really need to consider the luminance values of the ground, and I will often use grass as a correct reference point, but if there isn't any available, I know that sand will require +1 exposure compensation.
Applying +1 exposure compensation. Everything is transposed +1 stop
In the above diagram I've applied +1 exposure compensation, which means the entire scene has been brightened. This means that the ground is +1 over 18% grey, and the black rocks in the foreground are now -1 stop below 18% grey. The sky is +2 stops over mid-grey which is fine as i know Velvia has enough latitude to record this.
Re-balancing the scene - applying different graduation
However, I'm now thinking that since I have:
- Applied a 2 stop grad
- Applied +1 exposure compensation
The grad is not as effective as I would like it to be. Pushing the exposure +1 has reduced the strength of the grad from 2 stops to 1, from where we started. So I'm going to take out the 2 stop grad and replace it with a 3 stop grad:

Replacing the 2 stop grad for a 3 stop grad.
So I've left the ground exposure untouched. It is still at +1 exposure compensation, but i have brought the luminance of the sky down by a further stop so it is now -3 from its original position. But bear in mind although it is graded 3 stops, I have applied exposure compensation to the entire scene of +1 which means the grad is only really reducing by 2 stops (-3 stops +1 = -2 stops).
Before and After
So let's now compare what we started with, and where we needed up. In the two diagrams below, I do just that:

Initial scene with exposure set to the ground.

Final exposure with 3 stop grad applied and +1 exposure compensation applied to whole scene.
A word about histograms and exposure
Before we begin to look at the difference between the initial exposure and the final one, we must first consider how the human eye sees tones.
In a nutshell: we perceive every tone out there as a mid tone. To test this out, if you point your camera at the ground so it fils the entire area of the image and take a shot, the ground should look correctly exposed. The histogram will show you an exposure right in the middle, which suggests we perceive the ground as an 18% tone. Now do the same for the sky - point the camera completely up into the sky and take a picture. It too will look correct even though the histogram is in the middle and the sky is now 18% grey.
We perceive everything more or less as sitting in the middle of the tonal range. In fact, human vision is incapable of seeing true luminosity and we tend to compress the higher tones so we see the same thing.
When I am making exposures, I am attempting to move the ground towards the mid-tones of the histogram and I am trying to move the sky towards the mid-tones of the histogram too.
This is very important and I would read this again:
"When I am making exposures, I am attempting to move the ground towards the mid-tones of the histogram and I am trying to move the sky towards the mid-tones of the histogram too."
If we look at the scene after I've applied my 3 stop grad and added +1 exposure compensation, this is exactly what I've done: I've lifted the tones in the ground by +1 stop and reduced the sky tones by -2 stops. This can be seen in the following histograms:
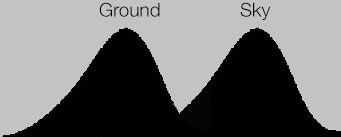
Original exposure with no grad or exposure compensation applied. Ground is underexposed, Sky is overexposed.

After applying a 3 stop grad and adding +1 exposure compensation, I've brought the ground and sky tones towards the middle.
The histogram on the right is what we should be aiming for. This is for a few reasons:
1) The ground has been moved towards the mid tones
2) The sky has been moved towards the mid tones
3) The scene is now 'balanced' and looks like what we see with our own eyes
But also, here are a few important things to consider that you get with your histogram on the right, which you lose with the histogram on the left:
1) You open up the shadow detail. There's more tonal information in the shadows
2) You open up the highlight detail. There's more room for the brighter tones to stretch out across the histogram.
When you don't do this, and end up with a histogram as you see on the left (I call it a double humper), you get the following problems:
1) You lose shadow detail because all your lower tones are squashed into the bottom left of the histogram and quantisation occurs - many tones become compressed into one single tone. You lose tonal detail and no amount of correction later on is going to recover that for you.
2) You lose highlight detail because all your higher tones are squashed into the top right side of the histogram.
3) You have to do more drastic editing when you return home and scan the films.
So when someone says 'I've got it all in the histogram', this may be OK for digital capture (well, it's not really), but for film it's not ideal at all. You still go home with an underexposed ground and an overexposed sky. Trying to recover shadow detail in film is a nightmare (and almost impossible with transparency film) and likewise turning down the overexposed sky brings out funky crossover effects and often I find the grain in the film becomes very evident due to drastic curves adjustments.
You need to balance the exposure in-camera. Even if you are a digital shooter this is still what you have to do and I don't subscribe to the idea that digital cameras have 12 stops of dynamic range so grads aren't required. They are still required for all the reasons pointed out above.
To finish up
Working out exposures in the field for film using a spot meter may sound complicated, but it really isn't. It's just a case of practicing.
I love spot metering my scenes. I also love not seeing what I'm getting. Using film means I have to construct the image in my mind's eye. What I like about this approach, is that it has taught me to really think about what tones are present in the scene. Through practice, I now know that black rocks are hard to record, and that I really need to lift the tones in the ground up towards the mid-tone or above it, and reduce the sky down towards the mid. This is not simply because the dynamic range of my film is limited (it's is a concern, but not the main reason). The reason is that in order for the scene to be truly balanced the way my eye sees it, I need to move everything towards the middle of the histogram. That means reducing dynamic range and shifting the ground to the right and the sky to the left.
The simplified version
Ok, that was quite long, and perhaps quite difficult to take in. So here's a simplified version:
- Meter the foreground and then meter the sky and work out how many stops difference there is and apply a grad for those number of stops.
- If the foreground is brighter than 18% grey, apply +1 exposure compensation
Or....
- Work out the difference in stops between ground and sky and apply a grad for the difference.
- Make two exposures. One with no exposure compensation and a second one with +1 exposure compensation applied.
- Go home and study the films.