Colourchrome book update

The printing of my 3rd book is now underway.

We've taken advanced orders for 240 copies of the 300 edition run, and I think the book may sell out before I even get to my exhibition date. So if you were planning on coming along to the exhibition and picking up a copy then, perhaps best to buy a copy online. It will be shipped out on the 2nd of August.

There's something deeply satisfying and very powerful about seeing a project come together that started out as an idea. What was once just a single thought becomes a real thing. That's very empowering.

Pareidolia

I didn't see the bear for a long time, and then once someone showed me it, it was a few years before I saw the seal. Can you see them?

Pareidolia - a psychological phenomenon in which the mind responds to a stimulus by perceiving a familiar pattern where none exists. Common examples are perceived images of animals or human faces - Wikipedia.

Outdoor Photography Magazine

Op-article.jpg

Many thanks to @OPOTY magazine for beautifully presenting my article in this month's edition of their magazine.

It was a rare chance to discuss my interest in painting and how historical paintings from some of the locations I have gotten to know so well, have influenced or informed what I do.

When I was a small boy, my parent's really supported me in my interest in drawing and painting. My aunt Helen, who was married to the late John Bellany (Scottish painter) would send me oil paints and other art materials.

It has taken me a while to acknowledge and understand the relationship between my art-beginnings and my photography. Indeed, I would be inclined to say that my landscape photography is really a continuation of the compositions I made as a small boy with oil paints and charcoal sticks.

Thoughts on approaching a location

Sometimes you find a location that is so sweet, you know as you approach it, that it's going to work.

The above image was just exactly like that for me.

Below is a 'contextual' image showing me approaching these trees. I'd seen this location from a far distance, and felt that a telephoto would not be sufficient to work around parallax issues with the trees.

Before I'd even set foot outside of the car, I could already see the potential in my mind's-eye - I had already begun to visualise and dream how the final images might turn out!  

But sometimes as I approach a landscape, it turns into something entirely different. I am pleased to say in this circumstance it held up to what I was visualising in my mind.

Context shot, showing me on location in Hokkaido. Image shot by my Hokkaido guide, January 2017

Context shot, showing me on location in Hokkaido. 
Image shot by my Hokkaido guide, January 2017

Although I love to edit my work and will often depart radically from what was there by using dodging and burning techniques, the final images you see here are pretty much verbatim. The only difference between the photograph of me on location, and my final images is that the sky clouded over once I got into the location, so there was more of a marriage between land and sky. 

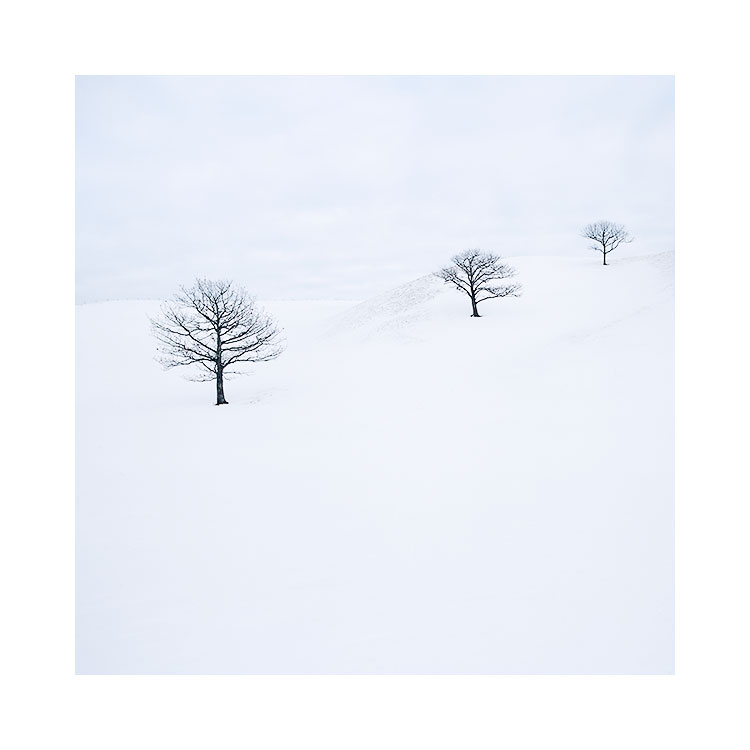
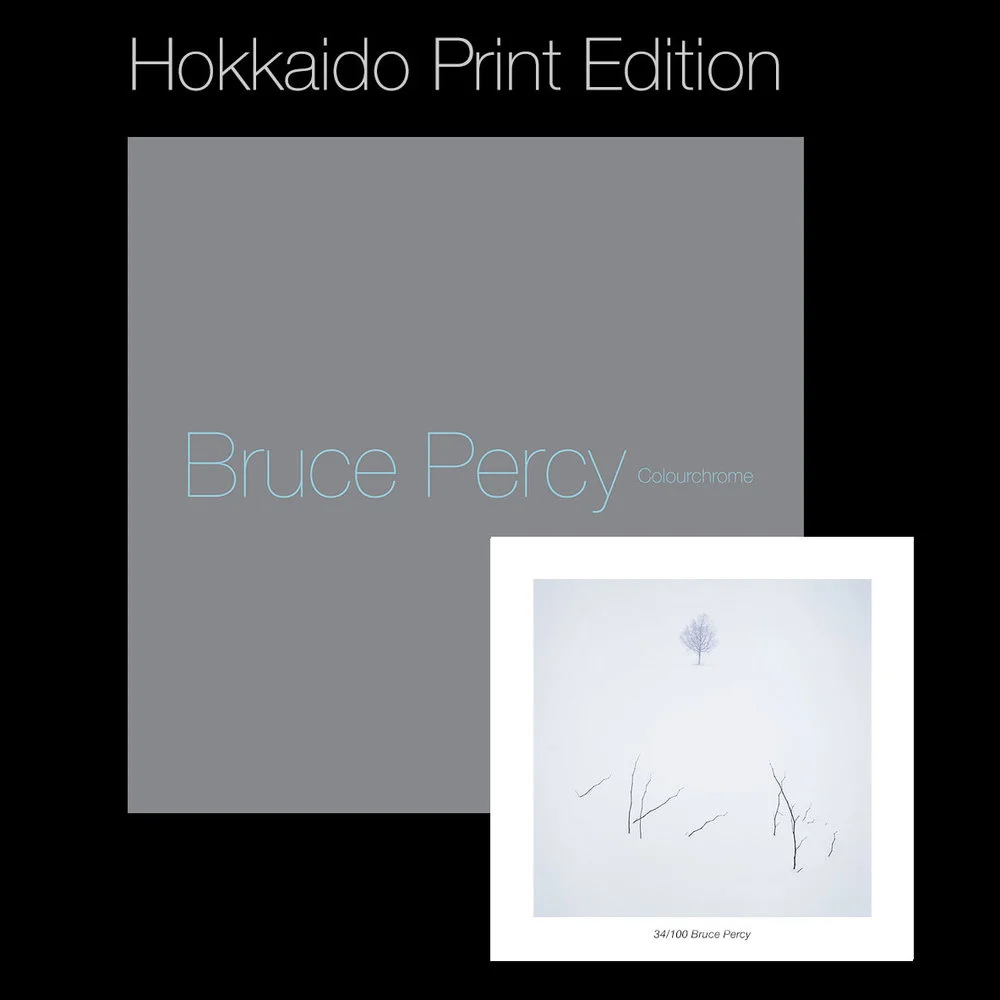
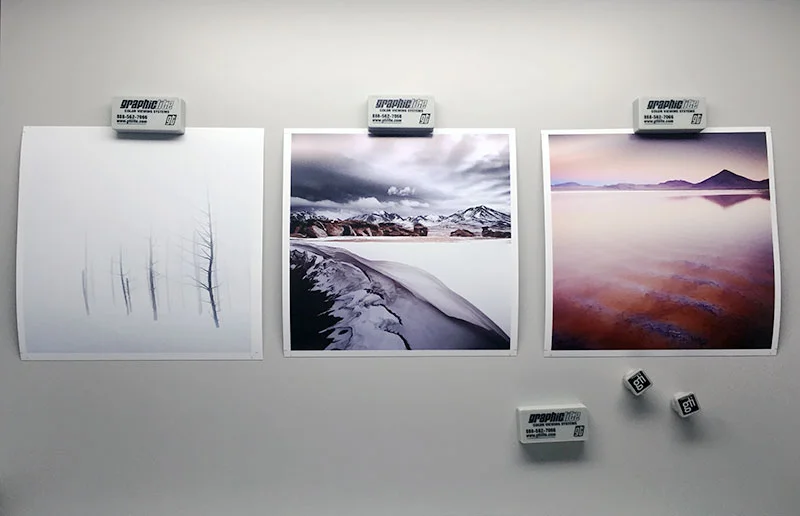
My only on-site decisions were more about placement - of where I should be standing to get different vantage points of the trees, and to be observant to any patterns that the trees made (see central image of the three trees at perfect placement to one another). Further, it was also paramount that I remove the background hedge from the shot at all costs, so I spent a bit of time looking for vantage points where the hedge would disappear from view.

I'd like to finish today's post by stating that often as a photographer i'm tempted to go closer towards the subjects I wish to photograph. Whether it's the edge of a lake or the edge of a cliff. This can sometimes be a real failing because of two points:

1) If you like your subject from where you are standing, then chances are it's not going to look the same once you get closer. So shoot it from where you've noticed it, before moving in. Practice using different focal lengths such as telephoto view to accomplish this.

2) As you approach a location you like, the elements start to move around and sometimes things get lost or hidden from view. See point 1.

Your journey can sometimes become an exercise in 'chasing rainbows'. You think that by getting in close, the composition will get stronger, but as you do approach, the scene falls apart and the subjects do not hold together in the way you first saw them. Often times, it's because the best vantage point was from where you started.

I'm glad to report that although I was worried that the big hike into this location,  on snowshoes might have resulted in the trees becoming obstructed by hills, or by my being too low to photograph the trees straight on, the location worked beautifully.

I knew it at the time things were going well. As I slowly made my way forward, the trees and the compositions I had in my mind's eye remained in place. But I did keep an eye on how the compositions were changing as I approached.

I'm a great believer that when something is working well, whether it be in my photography or in my life, it tends to flow and come together easily. That's exactly how these images happened. It was as if they fell into my lap.

Photographer's code of conduct

I’ve been thinking for a while now, that things are going to change with regards to the level of freedom that we photographers have in the landscape. 

El Arbol de Piedra, Siloli Desert, Bolivia 2016Image © Bruce Percy 2016

El Arbol de Piedra, Siloli Desert, Bolivia 2016
Image © Bruce Percy 2016

Since I started running tours and workshops in 2007, I’ve seen a dramatic increase in the numbers of general tourists visiting places of interest, which has also meant that there has been a corresponding increase in the number of photographers visiting places. Indeed, my income and business is in a growth sector of the tourism industry: photography workshops and tours are on the increase each year and there is currently no letup in terms of the demand for tours centred around photography. Whether you and I like the badge or not, we are tourists with cameras and although we might feel our aims are different from general tourist, we are still tourists.

In certain countries I have begun to witness levels of strict policing where it comes to what one can do in or around national parks. Chile for instance is becoming increasingly restrictive upon what one can do and they are not alone. Nor do I feel that their approach is wrong: they are simply trying to protect their areas of interest as best they can, because of the increased levels of foot fall.

This protection comes at a cost to the amount of freedom that one has as a photographer.

I can fully appreciate the concerns of the national park services and of other places where no clear demarcation line currently exists. Iceland for example has many wonderful landscapes that do not fall under the jurisdiction of national park protection and are currently wide open to the threats of increased traffic through tourism. Indeed Iceland is having a battle with general tourists who are not ‘outdoor-savvy’. Each year there are deaths at the black beach at Vík because general tourists who have little experience with the raw power of nature are found to be in a place where extreme spring tides are a real threat and have claimed lives. Iceland is in the infant stages of trying to manage the landscape to a degree where it is reasonably safe for tourists to visit, yet allow people the appropriate level of access so that their enjoyment of such a place is not severely impacted.

As it already stands, I am often left feeling that access to many wonderful areas of a landscape have already gone through severe restrictions to the detriment of what I wish to do with my photography. Indeed, even before such restrictions were put in place, I've often been left feeling that most national parks seldom catered for photographer's needs. Most lookout points are 'vista' shots that might satisfy the general tourist but leave a lot to be desired for most photographers. Indeed, I've found that these restrictions can often lead some to breach the limits of what many national parks deem as appropriate behaviour.

This brings me to an issue with the limited design of most access areas for photographers: we tend to over-step these demarcation points in an attempt to gain the photographs we seek. In doing so, we place ourselves and our fellow enthusiasts under the scrutiny of park authorities and tempt the introduction of further restrictions. Can landscape photographers be trusted to abide by the park rules when it is clear that they will leave certain trail areas in the pursuit of an image? This is my contention: many areas of national parks do not give us the freedom to explore, and at the same time, by exploring, we are in breach of park rules. What is to be done?

In the initial days of hiking trails and networks, nature lovers have had to walk a thin line between access and conservation. This should be no different for us photographers. We have a responsibility towards these special landscapes, and if we abuse this responsibility in the pursuit of an image, we risk ourselves and our community in getting a bad name, with further restrictions being put in place. In short: any unlawful behaviour by us hurts us.

Borax field, Laguna Colorada, BoliviaImage © Bruce Percy 2016

Borax field, Laguna Colorada, Bolivia
Image © Bruce Percy 2016

I foresee a time where photographer’s footprints will have increased so much, that we will be under scrutiny for our behaviour and it is only a matter of time. So I feel that the only way to manage this escalation of park rules, is to start to develop some of our own: if hill walkers have codes of conduct such as ‘leave only footprints’, and ‘take out the rubbish you carried in’, then so too must we adopt respectful laws.

Photography has reached an all-time high level of interest. There has never been more people making photographs in nature than ever before. Many of us have come to photography from a passion for the outdoors but some of us have arrived at landscape photography with little in the way of practical outdoor skills or awareness. To these new disciples, they have still to go through a learning curve of beginning to understand that landscapes need to be cared for and that nature is unruly and stops for no one. Respect is the key word here. The pursuit of an image although the intentions may be honest can sometimes lead to the landscape being abused through a lack of outdoor experience and as such it is perhaps time that we assemble a ‘photographer’s code of conduct’, a guide that sets out how one must conduct themselves in the landscape.

I am really writing this an an open-letter. I feel that at some point, in order to maintain our right to access these wonderful places, we need to begin right now to conduct ourselves as ambassadors for our community.

But perhaps it goes much further than this. Rather than waiting for someone to dictate rules and regulations as to what we photographers can and cannot do, perhaps we should be working out these terms before someone else - someone who has little understanding of our passion, does.

Times are changing. Tourism is increasing, special places of interest are seeing increasing levels of traffic, and it is only a matter of time before authorities start to place further restrictions on what we photographers can and cannot do. Our current and future behaviour will have an effect on those rules, and whether we have a good name as a community. 

Go wisely and with great respect around the landscapes you love. Until such time as photography has an accepted code of conduct; a bible of how one should treat the landscape and the others we encounter within it, we have everything to lose.

Now Taking Advanced Orders

On Friday night I announced the publication of my 3rd book, which is limited to 300 copies only. Since then, we have sold over a half of the copies. Which is terrific to see and I can only say a big THANK YOU to you if you have supported me and my art.

I love publishing books, and I love putting them together with my friend Darren Ciolli-Leach. Darren is really great to work with. A great designer is capable of listening to what you want, but also of telling you what will and won't work. Putting together a good design takes skill and experience and that's just what Darren brings to the design table for me. So THANK YOU Darren !

I'm hoping to publish more books in this kind of format. I can envisage one strictly about Hokkaido and another about Bolivia.... time will tell. But it's good to have projects to work on and to see where they will take me.

Anyway, if you're wanting to find out more about the book, or perhaps order a copy, here is the blurb for you. It also comes with the choice of three limited edition prints :-)

Book Proofs

Today I received three proofs for the book I'm publishing this summer.

Here are the three proofs displayed inside my viewing booth in my home studio. More about the book very soon!

Upcoming

Just a short heads up that I am publishing a new book this August. Keep an eye out for an announcement for a special edition. This book is limited to 200 standard copies and 100 special edition copies. More soon.

Colourchrome Monograph

90 pages, 25.4cm x 25.4cm
Published by Half-Light Press August 2017

Delving deeper

It's good to get to know a landscape. Well.

Cono de Arita, Puna de Atacama, April 2017
Image taken by my guide on his Samsung phone. My films won't be ready until the very end of May !

I've been back in the Puna de Atacama region of Argentina this past week making some new photographs. My first visit here was two years ago. It was only a fleeting six day visit to the area where I felt I was often in the wrong place at sunrise and sunset. Despite being pleased with my first efforts, the experience left me feeling I had only scraped the surface of this amazing place. So many locations were wonderful but I was often there during the middle of the day when the light wasn't good. This is often the way with visits to new places: the first visit is more about finding out what it is I want to photograph and the second visit is about photographing it!

I like to get to know a place well, and repeated visits are the only way to do that. I see photographing a place like a continual learning experience where I hopefully grow in terms of my understanding of the place, as well as in my photography.

Logistics are often the biggest obstacle in getting to photograph a place well. With the Puna de Atacama, the region is vast. So vast in fact that my first visit left me feeling frustrated because in the space of a mile or so, there would be so many locations that would be suitable for the brief 20 minutes of beautiful light at either side of the day. With only 20 minutes to play with before the light would be bleached out at sunrise, and only 20 minutes to play with before the light was gone in the evening, it made choosing locations very tough indeed.

On location in the Puna de Atacama desert, Argentina, April 2017

So this visit was more about finding those special locations, areas where I wouldn't have to move so much to capture different aspects of the landscape before the 20 minutes of beautiful light was gone. That meant a lot of day-time scouting and many hills were climbed to find vantage points where I would have better luck when the light was good.

Spot-metering the desert in Argentina, April 2017

Location scouting seems to be a trial of errors. Working out where the sun is going to be and how it might react with the landscape can be done to some degree with Stephen Trainor's wonderful TPE application, but there still needs to be a lot of walking and climbing done to find those beautiful compositions where shapes in the landscape form the symmetry and balance I'm seeking.

Indeed, standing still in one location that is (hopefully) the best spot I can find, sometimes reaps dividends. With the Cono de Arita (the volcano shot at the top of this post (made by my guide on his Samsung phone), it was a learning experience to see how the shadows of the surrounding mountains interplayed with the salt flat and the silhouette of the cone as the sun dropped behind the horizon.

I believe it is only by spending time, and observing how the light interplays with the landscape that I can truly learn to be a better photographer. To obtain the images I want, I need to put the effort in, and that often means re-visiting a landscape many times over. Indeed, any landscape that I fall in love with will often become a regular part of my yearly photography because it has the capacity to teach me so much.

Working out exposure for transparency film

 I was asked if I'd write a blog entry about how I work out my exposures. Bear in mind this is just my own take on it, and although it works for me, there are many other ways of doing this. So I'm not suggesting this is the only way, or the correct way, but it works for me. Also, before I begin, please know that I am 100% a film shooter. This is how I work out my exposures for Fuji Velvia film only (it's the only transparency film stock I use).

Velvia 50 transparences on my light table.

Velvia 50 transparences on my light table.

So here goes. Before I discuss exposures, let's do a bit of ground work and cover some basics. Here we go:

  • When you add 1 stop of exposure, you double the amount of light hitting the sensor / film.
  • When you subtract 1 stop of exposure, you half the amount of light hitting the sensor / film.
  • Therefore, exposure is a case of doubling or halving values.
  • Ansel Adams had the zone system (10 zones) which mapped to 10 stops.
  • With Velvia transparency film, the latitude of the film is only maybe around 3 to 5 stops. In those 3 or 5 stops you get 10 zones. So the way I work it out, is I assume that Velvia has a latitude of 3 stops, and that means I roughly allocate three zones of Ansel's system to one stop. I've never found that adding +3 stops to make snow white has every worked for me. It's always a case of adding +1 stop only.

I've constructed a simplified diagram below of a landscape. In it, we have the ground (I've chosen to use this as my  exposure point (18% mid grey) and therefore it has zero stop difference. Everything else in the diagram has it's difference in stops detailed - in comparison to the ground. In effect, the ground is our 'reference' point for everything else in the scene. This is pretty much what I do most of the time - assume my ground wants to be exposed at 18% grey, and work out where everything else is in relation to that, and also how much grad I will require to ensure the sky does not blow out.

About metering - 18% Grey

With metering, you should also know that the reading you get, is what it takes to make whatever you measured mid-grey (18%). Meter a white door and the reading you get is what it will take to turn that white door mid-grey. Meter a black door, and the meter will tell you what it takes to turn that black door mid-grey. So whatever you point the meter at - it's telling what exposure you need to turn the subject mid-grey, and you need to apply a degree of compensation to it to make it turn out how you think it looks.

For example, if I want a white door to be white, I will apply +1 stop exposure compensation (with Velvia, that's sort of like zone 8 in Ansel's terms). To turn the black door black, I will need to underexpose by -1 stop (turning zone 5 into zone 2).

Spot Metering a Scene

In the following illustration, I've broken down a scene into it's exposure components by stops.

Scene as is, before doing anything.

Scene as is, before doing anything.

In it, I have:

Ground, used to set the exposure so there is zero stops difference here.
Sky +3 stops brighter than the ground
Clouds +2 stops brighter then the ground
Black rocks -2 stops darker than the ground.

Grading the Sky to similar luminance as ground

I've worked out that I want the clouds to appear the same tone as the ground, so I'm going to grad the whole sky by -2 stops, therefore reducing the clouds to the same luminance as the ground, and also reducing everything in the sky by 2:

After applying a 2-stop grad

After applying a 2-stop grad

In the above diagram I have graded the sky by 2 stops. The white areas of the sky are still at +1 compared to the ground and that is fine with me, as I know Velvia can handle this. 

Where to set the mid-tone?

But what you should be asking yourself is whether setting the exposure for the scene on the ground values is correct. Depending on the luminance of the ground, I may wish to apply some exposure compensation to render the ground the way I perceive it.

Bear in mind that when taking a reading, you are asking the meter to tell you what exposure setting to use to turn the subject 18% grey. I've found that the following ground conditions require different amounts of compensation:

  • Sand (+1 exposure compensation)

Although it looks grey in colour or may appear mid-grey, Sand is actually brighter than 18% grey so if I meter sand and want it to come out the way I see it, I have to apply +1 stop exposure compensation.

  • Grass ( 0 exposure compensation)

Grass is 18% grey, so metering it gives me the correct value to render it the way I see it.

  • Stones (+1 exposure compensation to -1 exposure compensation)

Stones vary in luminance. Black stones need to be rendered at -1 exposure compensation while most 'mid-grey' stones require +1. We tend to perceive brighter objects as less bright. So a stone that is brighter than 18% grey is often perceived as 18% mid grey when it's not.

So to set the exposure on my scene, I really need to consider the luminance values of the ground, and I will often use grass as a correct reference point, but if there isn't any available, I know that sand will require +1 exposure compensation.

Applying +1 exposure compensation. Everything is transposed +1 stop

Applying +1 exposure compensation. Everything is transposed +1 stop

In the above diagram I've applied +1 exposure compensation, which means the entire scene has been brightened. This means that the ground is +1 over 18% grey, and the black rocks in the foreground are now -1 stop below 18% grey. The sky is +2 stops over mid-grey which is fine as i know Velvia has enough latitude to record this.

Re-balancing the scene - applying different graduation

However, I'm now thinking that since I have:

  1. Applied a 2 stop grad
  2. Applied +1 exposure compensation

The grad is not as effective as I would like it to be. Pushing the exposure +1 has reduced the strength of the grad from 2 stops to 1, from where we started. So I'm going to take out the 2 stop grad and replace it with a 3 stop grad:

Replacing the 2 stop grad for a 3 stop grad.

Replacing the 2 stop grad for a 3 stop grad.

So I've left the ground exposure untouched. It is still at +1 exposure compensation, but i have brought the luminance of the sky down by a further stop so it is now -3 from its original position. But bear in mind although it is graded 3 stops, I have applied exposure compensation to the entire scene of +1 which means the grad is only really reducing by 2 stops (-3 stops +1  = -2 stops).

Before and After

So let's now compare what we started with, and where we needed up. In the two diagrams below, I do just that:

Initial scene with exposure set to the ground.

Initial scene with exposure set to the ground.

Final exposure with 3 stop grad applied and +1 exposure compensation applied to whole scene.

Final exposure with 3 stop grad applied and +1 exposure compensation applied to whole scene.

A word about histograms and exposure

Before we begin to look at the difference between the initial exposure and the final one, we must first consider how the human eye sees tones.

In a nutshell: we perceive every tone out there as a mid tone. To test this out, if you point your camera at the ground so it fils the entire area of the image and take a shot, the ground should look correctly exposed. The histogram will show you an exposure right in the middle, which suggests we perceive the ground as an 18% tone. Now do the same for the sky - point the camera completely up into the sky and take a picture. It too will look correct even though the histogram is in the middle and the sky is now 18% grey.

We perceive everything more or less as sitting in the middle of the tonal range. In fact, human vision is incapable of seeing true luminosity and we tend to compress the higher tones so we see the same thing.

When I am making exposures, I am attempting to move the ground towards the mid-tones of the histogram and I am trying to move the sky towards the mid-tones of the histogram too.

This is very important and I would read this again:

"When I am making exposures, I am attempting to move the ground towards the mid-tones of the histogram and I am trying to move the sky towards the mid-tones of the histogram too."

If we look at the scene after I've applied my 3 stop grad and added +1 exposure compensation, this is exactly what I've done: I've lifted the tones in the ground by +1 stop and reduced the sky tones by -2 stops. This can be seen in the following histograms:

Original exposure with no grad or exposure compensation applied. Ground is underexposed, Sky is overexposed.

Original exposure with no grad or exposure compensation applied. Ground is underexposed, Sky is overexposed.

After applying a 3 stop grad and adding +1 exposure compensation, I've brought the ground and sky tones towards the middle.

After applying a 3 stop grad and adding +1 exposure compensation, I've brought the ground and sky tones towards the middle.

The histogram on the right is what we should be aiming for. This is for a few reasons:

1) The ground has been moved towards the mid tones
2) The sky has been moved towards the mid tones
3) The scene is now 'balanced' and looks like what we see with our own eyes

But also, here are a few important things to consider that you get with your histogram on the right, which you lose with the histogram on the left:

1) You open up the shadow detail. There's more tonal information in the shadows
2) You open up the highlight detail. There's more room for the brighter tones to stretch out across the histogram.

When you don't do this, and end up with a histogram as you see on the left (I call it a double humper), you get the following problems:

1) You lose shadow detail because all your lower tones are squashed into the bottom left of the histogram and quantisation occurs - many tones become compressed into one single tone. You lose tonal detail and no amount of correction later on is going to recover that for you.
2) You lose highlight detail because all your higher tones are squashed into the top right side of the histogram.
3) You have to do more drastic editing when you return home and scan the films.

So when someone says 'I've got it all in the histogram', this may be OK for digital capture (well, it's not really), but for film it's not ideal at all. You still go home with an underexposed ground and an overexposed sky. Trying to recover shadow detail in film is a nightmare (and almost impossible with transparency film) and likewise turning down the overexposed sky brings out funky crossover effects and often I find the grain in the film becomes very evident due to drastic curves adjustments.

You need to balance the exposure in-camera. Even if you are a digital shooter this is still what you have to do and I don't subscribe to the idea that digital cameras have 12 stops of dynamic range so grads aren't required. They are still required for all the  reasons pointed out above.

To finish up

Working out exposures in the field for film using a spot meter may sound complicated, but it really isn't. It's just a case of practicing.

I love spot metering my scenes. I also love not seeing what I'm getting. Using film means I have to construct the image in my mind's eye. What I like about this approach, is that it has taught me to really think about what tones are present in the scene. Through practice, I now know that black rocks are hard to record, and that I really need to lift the tones in the ground up towards the mid-tone or above it, and reduce the sky down towards the mid. This is not simply because the dynamic range of my film is limited (it's is a concern, but not the main reason). The reason is that in order for the scene to be truly balanced the way my eye sees it, I need to move everything towards the middle of the histogram. That means reducing dynamic range and shifting the ground to the right and the sky to the left.

The simplified version

Ok, that was quite long, and perhaps quite difficult to take in. So here's a simplified version:

  1. Meter the foreground and then meter the sky and work out how many stops difference there is and apply a grad for those number of stops.
  2. If the foreground is brighter than 18% grey, apply +1 exposure compensation

Or....

  1. Work out the difference in stops between ground and sky and apply a grad for the difference.
  2. Make  two exposures. One with no exposure compensation and a second one with +1 exposure compensation applied.
  3. Go home and study the films.