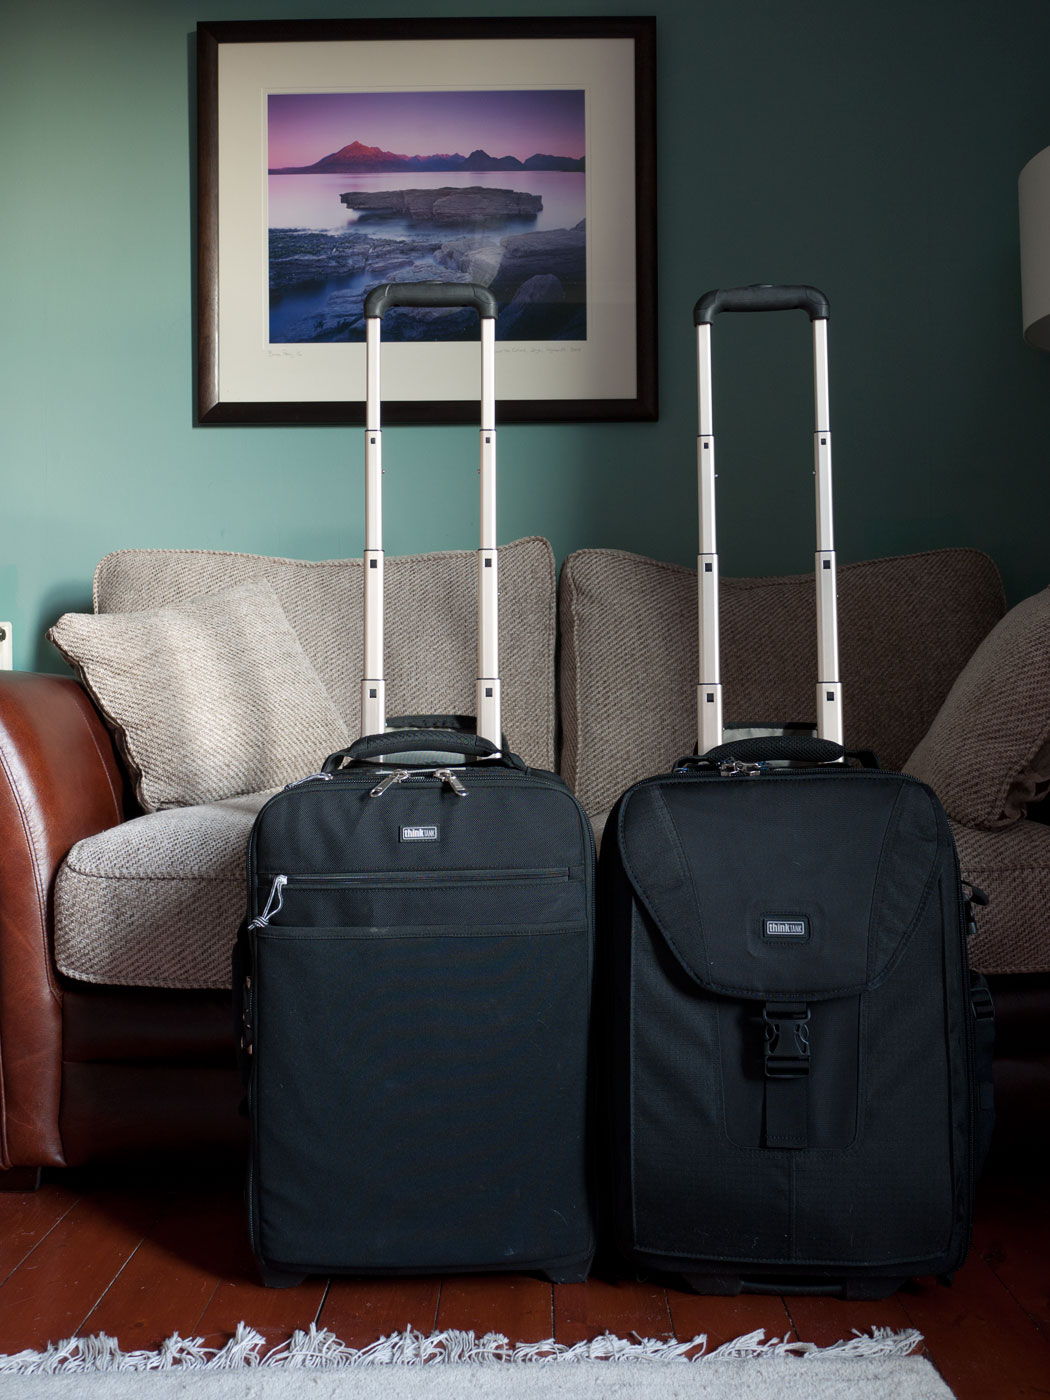
ThinkTank Airport Takeoff

Preamble

This posting is a review of a camera bag. Before I go any further, I would like to explain that a few weeks back, I was contacted by ThinkTank, who said that a lot of their customers have cited my blog as a good source of photography information. ThinkTank got in touch with me to ask firstly, had I heard of them, and secondly, would I like to look at some of their products?

Well, I do know of ThinkTank, as I bought one of their bags around 3 years ago - the Airport International. It's a great bag for helping me get through the airport merry-go-round, with all my camera equipment intact. It is, perhaps one of the few bags I own that I have an extremely high regard for.

But as much as it's a great bag, no bag can satisfy everything I need from it. The Airport International is great for the airport, but once I'm at a location, I tend to use a second bag for day to day shooting (this is usually squashed up and placed inside my checked in luggage). So when ThinkTank offered to send me some freebies, I said that I would be interested in two bags:

1) The Airport Takeoff. This bag is similar to my existing international bag, but offers to act as a backpack once I've got through the airport merry-go-round and am now on location somewhere. It seems very appealing as it can continue to be of use once I'm shooting.

2) A waste level camera bag. They are sending me one when they have stock. Personally, I hate backpacks, much preferring to have access to my gear without having to stop, lay the backpack on the ground, and remember to zip it up before I try to put it on my back (I've forgotten a few times, and have had lenses and bodies spill out everywhere). But i use backpacks now, because in my 40's, I'm more aware of looking after my spine!

But I must stress that I did not pay for this bag. It has been sent to me to see what I think of it, and I also must stress that I am under no obligation by ThinkTank to review it and there is no contractual agreement in any shape or form.

This review though, is about the Airport Takeoff, with some comparisons to the Airport International.

In a few words

If you would like to cut to the chase, I will say that this is an excellent bag, with amazing build quality. It is a very high end, professionally made bag, with very logical layout and some nice small (but essential) add on features. I'm really taken with it, so much so, that I'm going to try to use it for all my future foreign trips where I am not trekking at the other side (when I trek, I take an 80L Macpac rucksack and extend the hood, so I can slot in a small camera bag - when will someone invent a trekking backpack that has a detachable camera bag?). But when I'm going some place where I don't expect to have my temporary home strapped to my back, I would definitely take the Airport Takeoff.

The review

The Airport Takeoff conforms to most airline dimensions for a walk on bag - US and Europe. I would say that this is true for most airlines. I have found some where the overhead lockers are simply unsuitable for putting anything in, unless it's a toothbrush. So under those circumstances, I've managed to get by, either by storing the bag below my seat, or by the air cabin crew storing it somewhere for me. There's little we can do about this, but the Takeoff has been designed well to work with most airlines.

It's very sturdy. They've taken a lot of care in the design to include non rip materials and the bag is extremely durable. Think 'military' rather than 'wallmart', in terms of strength and attention of robustness. It would be very easy to think these bags are costly, but when you actually see the build quality to them, you know the money has got you a bag that will last for a very long time. ThinkTank have told me that one of the design concerns was to make bags that won't get thrown out so quickly. Not only do they provide you with something that should last a lifetime, they have told me that with their warranty program - they try to keep the gear on the road for much longer. I can't stress enough, that when I got the bag, just one look at how much effort had gone into making it very durable - instantly made me think the price tag was entirely justified. This is perhaps something that's not easy to convey in any marketing material or by looking at pictures of the bag on the web.

Comparing it to my International bag, I'd say it's of very similar build, and that bag, has been thrown about in dusty old Rajasthan as well as Nepal. The wheels are solidly made, although I see the Takeoff wheels are made from a type of heavy duty plastic, whereas the International bag I own has alloy wheels. I'm not sure why this design change, but they do seem very robust and I have a lot of confidence in them to work under very abnormal situations.

The internal compartment is very roomy. They give you plenty of section material to allow you a lot of freedom to re-organise the bag to your own tastes. The space is deceptively large and I can easily fit my entire Mamiya 7II outfit, plus filters and also my old Hasselblad 500CM camera with three lenses too. Personally, big bags encourage me to take far too much gear, and I often find myself overburdened once I'm at my destination. But there's plenty of room in this bag to handle most needs, including large lenses such as a 400mm Canon telephoto. There are also lots of zipper compartments to hold things like batteries, cleaning cloths etc.

If you are the type of person who wishes to take a laptop with you, then you can buy recessed sections from ThinkTank to allow you to have the laptop inside the bag. I've got the recessed sections for my international bag. I kind of wish they would just include it as part of the original bag, because although the recessed sections are a less deep, they're more than adequate for keeping all your gear organised, and still provide plenty of real estate for storing of bodies and lenses.

There is a nice security cable for the bag and they also provide a padlock for it too. So you can lock the bag to something. I liked that feature with my International bag, which didn't come with a padlock.

Now, the whole point about this bag, is that you can use it as a dual purpose bag - for the airport, and also as a backpack. The straps are nicely contained in a pouch on the back of the bag, and are easy to get at. The entire side of the bag unzips and flips back to reveal the straps. I thought, upon first inspection, that the flap would just hang down and flap around, but they've taken care to give you a velcro fitting below the bag to allow you to keep it firmly out of the way.

I was wondering just how comfortable it would be to put a walk-on trolley bag on my back, and it turns out that this is pretty good. The flap that folds back to reveal the straps acts as a lumbar support. The bag doesn't feel like a compromise when in backpack mode - I felt right at home with it on my back as soon as I put it on. The only thing I felt that was missing, was some form of waste strap, but I think this would have caused some major headaches trying to fit that into the limited space requirements they are trying to keep the bag to. You do however, get a breast-plate strap to keep the two straps from falling back off your shoulders. Under the circumstances, I think this is sufficient.

In terms of weight, I don't think the bag is heavier than my current backpack - a Lowepro Vertex 200 bag. That's pretty amazing, considering it has a very sturdy extendable handle built into it, as well as the strong wheels too.

If there is one part of the bag that I find a bit fidgety, it is the tripod holder section. I do feel, that ThinkTank put a lot of effort into it. The initial set up of putting the straps together is a little bit of a fidget, but what's nice about it, is that to take some of the straps off, or fold some of them away into the nearby pouch isn't much of a big deal, and they did include that small pouch just for this scenario.

I have a series 3 Gitzo tripod. It's pretty big. I was able to have it in the side holster on the bag, and use it no problem. Personally, I just don't get holders for tripods. I feel that a camera bag should be for holding cameras and lenses, not for acting as a tripod holder too. So for me, I think I'll have a tendency to forget about the attachements - simply because I can't get enthusiastic about having any bag take care of my tripod for me. What I would like, is for someone to design a sling-shot style cable that is easy to attach to a tripod. I hate tripod bags. I want to have quick access to my tripod and bags just get in the way.

In terms of flying with tripods, ThinkTank aren't assuming you will attach the tripod to the side of the bag. I'm sure that most airport security is not going to allow you on a plane with a three-pronged impaling instrument, so do what I do - wrap lots of clothing around it, take the ball head off, wrap lots of clothing around that too, and place them right in the centre of your check in luggage.

Summary

In summary, I'd say that this is a remarkably well engineered, beautifully designed 'high-end' bag, and I will be using it for my forthcoming trips to Switzerland this October and Norway and Iceland later on this year too. I will feel very secure getting through airports because the bag conforms to airport guidelines and it's very sturdy. It also works very well as a backpack when I'm there, so I won't need to pack a second walk around bag. So if you're doing a lot of flying, want to be less conspicuous, and want to use the bag as a backpack once you're there, then I for one, would be very happy to recommend it to you.

I'll keep you posted how I get on with it. There are a few trips coming up where I'll be taking it for sure (Switzerland, Norway, Iceland, Patagonia & Bolivia).

Book mock up

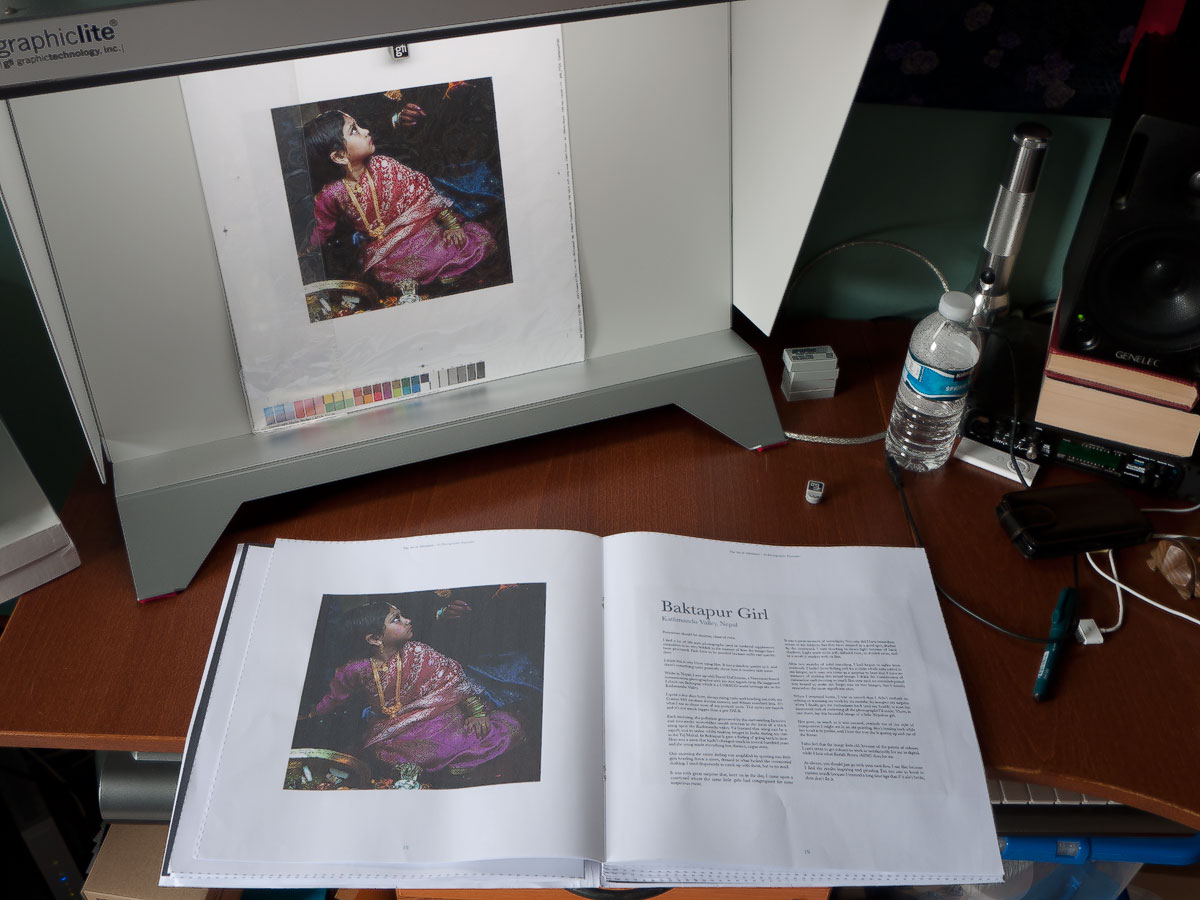
Last night I posted some images of two proofs from my forthcoming book. The proofs look amazingly accurate considering that all books are printed in a four ink process - CMYK (Cyan, Magenta, Yellow, Black).

But today, I thought I'd show you a small preview of the book layout (click for larger view). In this picture you can see a 1:1 mock up of the book (it's 12 inches by 13 inches in size) that the printer has sent to me. Don't assume this is close to the final print, because it's not. It's printed on standard office paper, and the colours and depth are way off. It's simply intended for verifying layout. They have generated this from the Quark Express press ready file we sent them. It's their way of double checking that I'm happy with the order of the pages, and for me to sign off or let them know about any corrections.

First Book Proofs

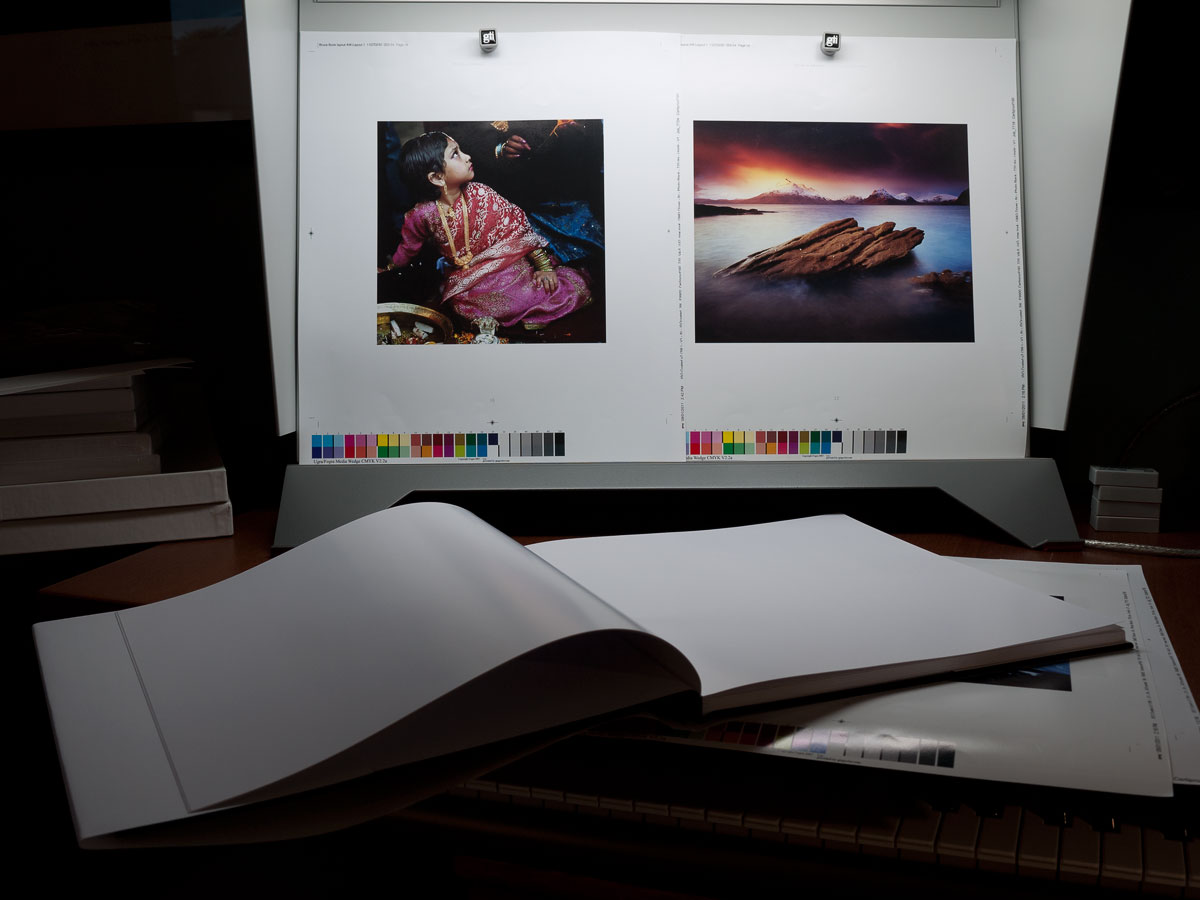
Today I received my first set of proofs for my forthcoming book, from the printer. In the image below (click for a larger view), you can see two of the proofs in my day-lit balanced viewing booth in my studio. I've also included the blank-canvas book they sent me to confirm the format and also the paper quality type.

I must say that seeing the first proofs has given me great confidence in the final book. The printer in question is very experienced at doing fine art photo books. What I especially like about them is that their printing standards conform to the Ugra/Fogra ISO printing standard. So they're well up on their colour management for press output.

I'll keep you all posted as things progress, but I feel I'm not too far away now, from the book being printed.

Beyond Words at Stills Gallery

One of the UK's leading photographic book shops - Beyond Words, is going to be at this years Edinburgh Festival.

I love good quality photographic books, and because of this, I'm keen to help support small specialised book stores as much as I can. Amazon can maybe compete with price, but there's something to be said about speaking to someone who has a breadth of knowledge about photographers, knows their work really well, and also knows about their published work to date.

Neil has a great selection of photographic books. For me, it's like being let loose in a sweetie (candy) store. I find this one of the best things - being able to find out about other artists and their work.

If you're going to be in Scotland during August, you can find Neil & Co from Beyond Words with a host of books for browsing (and buying) at Stills Gallery (23 Cockburn Street, EH1 1BP) from Tuesday the 8th to Saturday the 13th of August (11am to 7pm).

Assynt workshop - last minute cancellations

Two of my clients for the Assynt workshop this October, have had to pull out because of ill health.

This is just a short post to say that I now have 2 spaces available for those of you who had been interested in the workshop, but had noticed these past few months that it was sold out. I expect these spaces to go very quickly.

You can find out more about the Assynt workshop, as well as book (if you want to come)  here.

Making time.

Today I've been printing some of my work. Having a fully calibrated system at home has given me great confidence in my work from concept to final print. It's just great. I don't like to go over my older work too much as I feel that what's done is done. But printing some of these images today from my favourite island here in Scotland - Eigg, I have been considering something that Brooks Jensen covers in his fantastic book 'Letting go of the camera'.

Brooks discusses how a lot of budding photographers are keen to get out there to make images, but never seem to have the time - time as we all know, is a precious commodity. Brooks suggests that many photographers use their busy lives; family & work commitments as a way to explain why they never quite get round to creating that body of work they have always meant to do.

In his article, Brooks also discusses famous photographers, and how he, tends to view them as people that lead exceptional lives, which he knows is incorrect, because as he points out; Ansel Adams would have mown his lawn from time to time and even taken the trash out. In other words, as much as we put some very talented people on a pedestal, and like to think that they create work because they are different from us, they are still human, and still have all the time constraints placed upon them that we have. They too have family commitments and work commitments (yes, pro photographers don't spend all day meandering about making great art).

If I look at my own life at the moment, I'm aware that for the past two years, I've been so busy running a workshop business. I've not had as much time as I'd like to dedicate to my own photography.

But looking back at some of the images contained within my A2 print out today (See above), a lot of these were created during the tail end of workshops. In fact, I'd go as far as saying that although I've had less time to be on my own and make images, I've created some of my best images to date over one year simply because I was on location more often than not (admittedly, I had very little time while I was there, because my priorities were to run a workshop and spend as much time with my clients - but I did manage to make some of my best images all the same, because I was outside more times than I have ever been in any other vocation that I've held in the past).

A lot of us think that we need to go somewhere special to make images. We also think that we need to set aside some special time to do it in. Only when the circumstances are perfect - no pressing engagements, no work commitments, no family commitments - then we will be free to be creative. We believe that, until that time is here; we can't be productive or make good images, or tune into our creativity. We essentially put a limit on our photography before we've even set foot out the door!

I think when we give ourselves those sets of rules to be creative within, all we're really doing is procrastinating. It's been cleverly disguised as some valid reason, but it's just another form of creative constipation.

I'm sure that if we want to create art, we will do so, no matter what the obstacles are.

ps. I intentionally show you two images here: the first is the file used to print on my Epson 4880, reduced for the web, while the second is taken with my Lumix GF1 of prints generated from the same file (raw, with no colour applied - I fully appreciate that digital devices such as digital cameras are not colour accurate - but the tolerances here are small and ilustrate reasonably well the colour accuracy I have in my printer set up).

Black sand, white ice - metering?

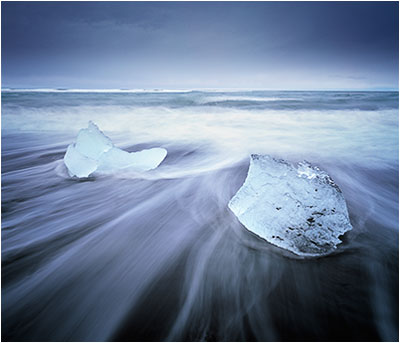
When I visited the black sand coast line at Jökulsárlón (glacial lagoon), in south east Iceland this June, I had a bit of a problem trying to figure out how to meter the scene. I've been a film shooter since the late 80's and feel I know my medium well. I use a Sekonic 758 meter at present (although I personally wish I'd not bothered, and stayed with the superb 608 meter instead). Both meters are fine, but the 608 allowed me to see at a snap the shutter speeds for all the meter readings I record (the meters allow me to take up to 9 different spot readings of a scene).

But every now and then, I come across a landscape I'm not sure just how to meter.

My usual technique is to meter the darkest area of the picture (usually the ground) and then meter the lightest area of the picture (usually the sky) and see how many f-stops there are between them (dynamic range). I know my film can handle around 4 to 5 stops of dynamic range, and that the real world often exceeds this. My Sekonic is a snap at telling me how much contrast there is in the scene and if it exceeds what my film is capable of recording, I will use an ND grad filter to reduce that dynamic range, so I can squeeze the scene onto my film without having any blown highlights, or blocked shadows.

But I have to set the exposure somewhere between the darkest and brightest parts of the scene. If I choose to set the exposure to the meter reading for the black sand, I will make the sand mid-grey. The same with the sky. If I meter the sky and use that for my exposure - I will make the sky mid-grey, and most probably seriously underexpose the black sand.

Using the zone system that Ansel Adams developed, I tend to go on the principle that if I want an object, such as the ice to be brighter than mid-grey, I will meter the ice, and then add 1 or maybe two stops. But in this picture, I simply looked at the dynamic range of around 5 stops and decided I needed to expose right in the middle. This would mean that the sand would be 2.5 stops below my exposure, and my ice and sky would be 2.5 stops above. I used a 2 stop hard grad to control the brightness of the sky, which meant that the sky and ground had a similar luminance, while the ice would be 2.5 stops over.

I wasn't sure at the time if I was getting it right. I just decided I had to go with my evaluations of the scene and prey that I'd not screwed up.

When I got home, I completely forgot to consider how difficult the exposures had been whilst at Jökulsárlón, because all the images came out beautifully exposed. This is a lesson in itself. We often don't question why an image worked. It's good to realise that what you did at the time of capture was correct, and learn from that. Conversely, the images that didn't work are just as important. Often, photographers quickly discard the images that failed, but so much can be learnt from them.

With my camera system, I sometimes forget I have a full ND filter on the camera, sometimes I don't take that into account when making my exposure. I'll sometimes see images where the exposure is so off, that it can't have been through bad judgement, but through bad practice. Workflow is everything. Get yourself organised and cut down any possible error when making images.

More December Planning

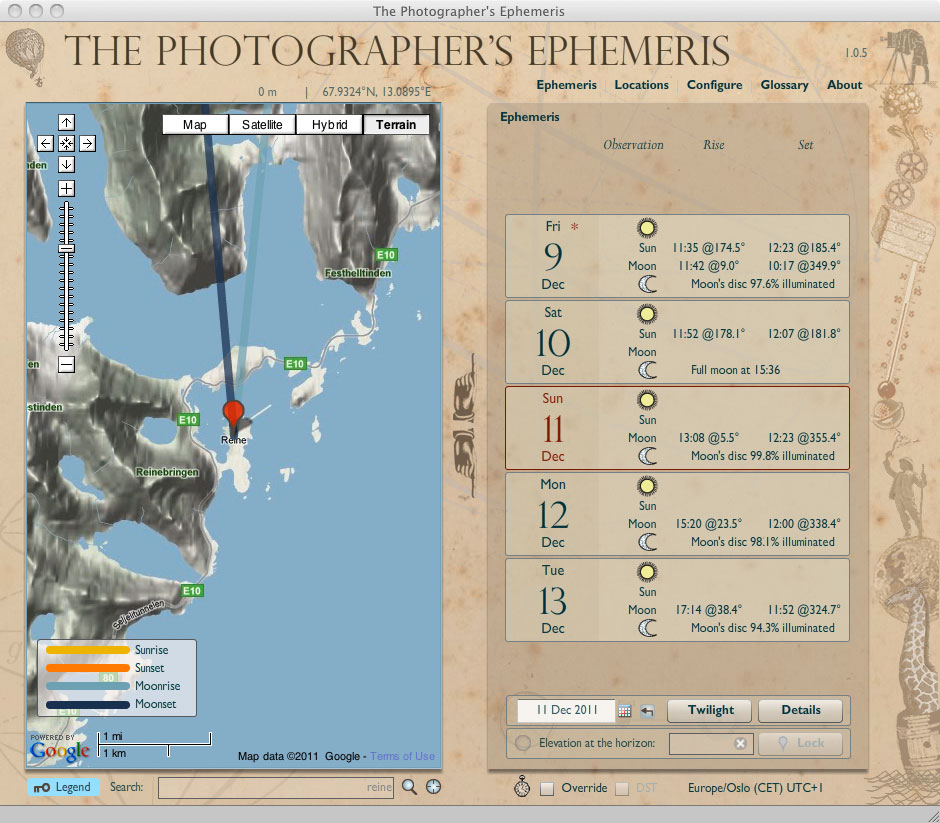
I'm almost ready to get the credit card out and book a flight to Norway for this December. I noticed on The Photographer's Ephemeris that there are no details for sunrise and sunset from the 11th of December onwards. This at first, was a little strange to take in, until I realised that the sun does not rise above the horizon and therefore, nor does it set. The place is in perpetual darkness from the 11th of December until the 3rd of January, as you can see here in this screen shot of TPE:

As you can see (click to see a larger view), there are no times for the sun (or the moon for that matter) on the 11th of December. So this means that I need to plan my trip to go a little earlier in December.

Personally, I wish to experience the perpetual darkness, so having perhaps most of the week with some sun, and maybe a few days of perpetual darkness is something to plan for.

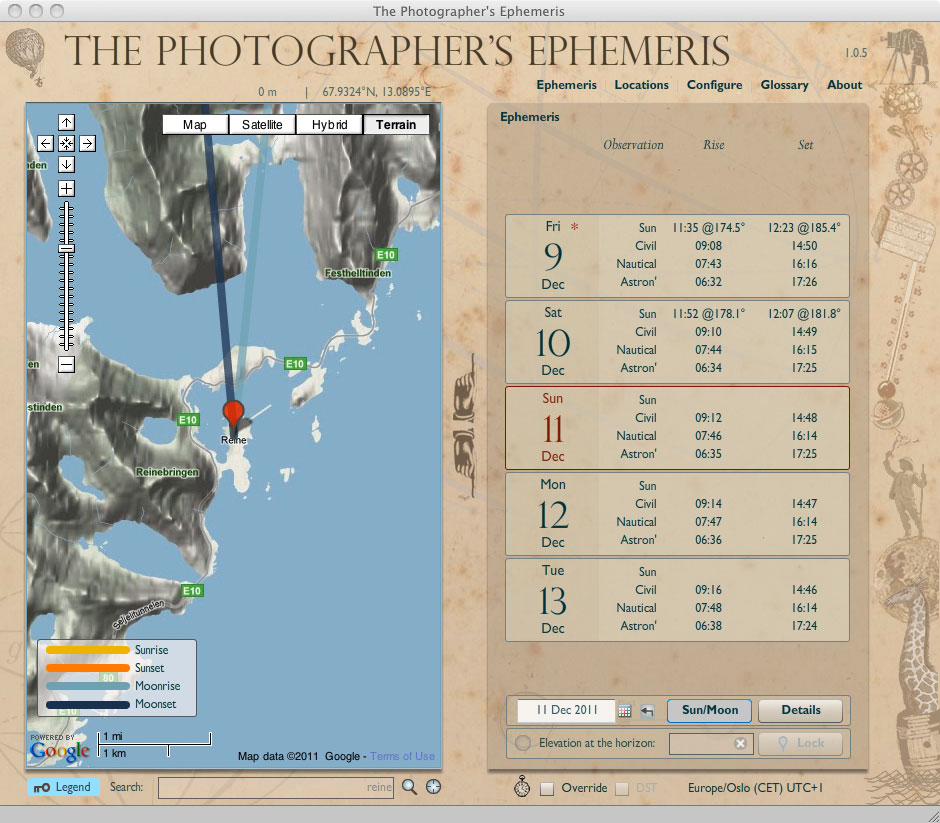
But what about the twilight time? I love shooting in twilight and my friends in Lofoten tell me that it never really gets absolutely black, so let's study TPE for twilight:

As you can see (click for larger view), there are recordings for twilight. I'm interested in Civil twilight as that is the twilight where objects are discernible to the eye. You can see that on the 11th, although there is no sun, civil twilight begins at 9:12am and finishes at 14:48 in the afternoon. So I have 5 and a bit hours to shoot in twilight.

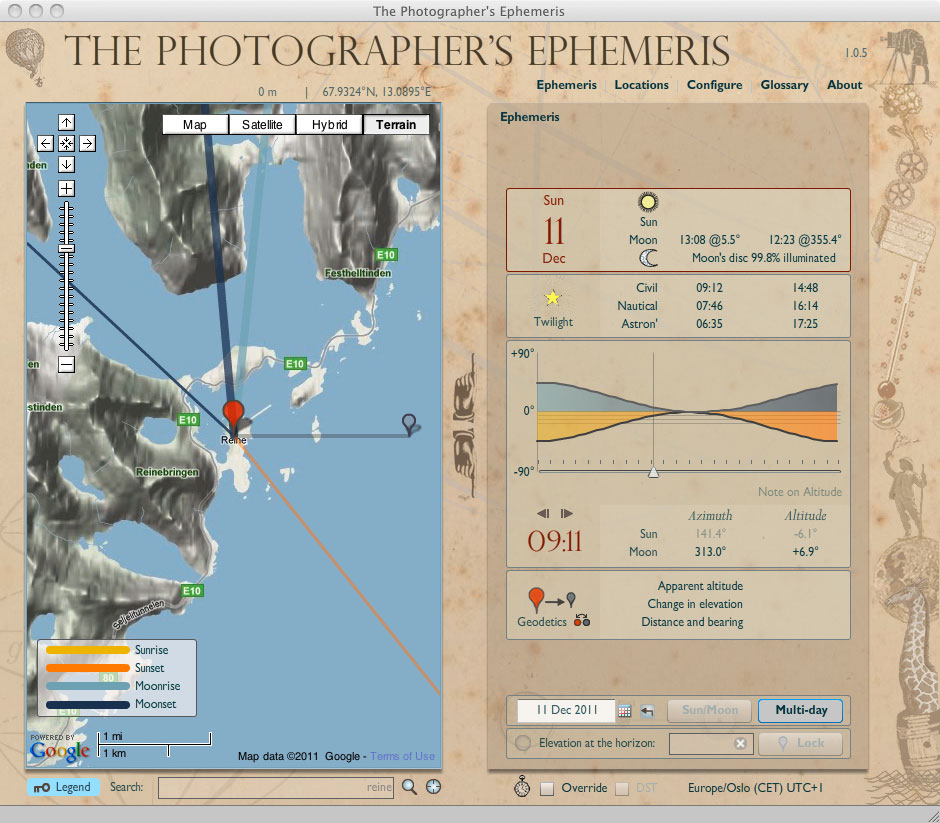
So what is actually happening to the sun throughout the day? With civil twilight, the sun is -6º below the horizon, so let's look at TPE's details tab:

You can see that the sun is around -6º below the horizon at 9:11am in the morning, and the sun gets a little higher than that until it starts to dip around 2pm. The yellow part of the curve is the angle of the sun throughout the day. The blue curve is the angle of the moon throughout the day. So if we look at the graph, we can see that the sun never gets above the horizon.

But the good news is that I have around 5 hours of twilight to shoot in. Very worth hanging around for, and not heading off home early, like I initially thought.

Lofoten in December

Due to unforeseen circumstances, I've had to cancel my personal photographic trip to Lofoten this week. But the good news is that I will be going back in December for just over a week to do my own photography. I feel that some places are an ongoing project and Lofoten has certainly captured my imagination in that respect.

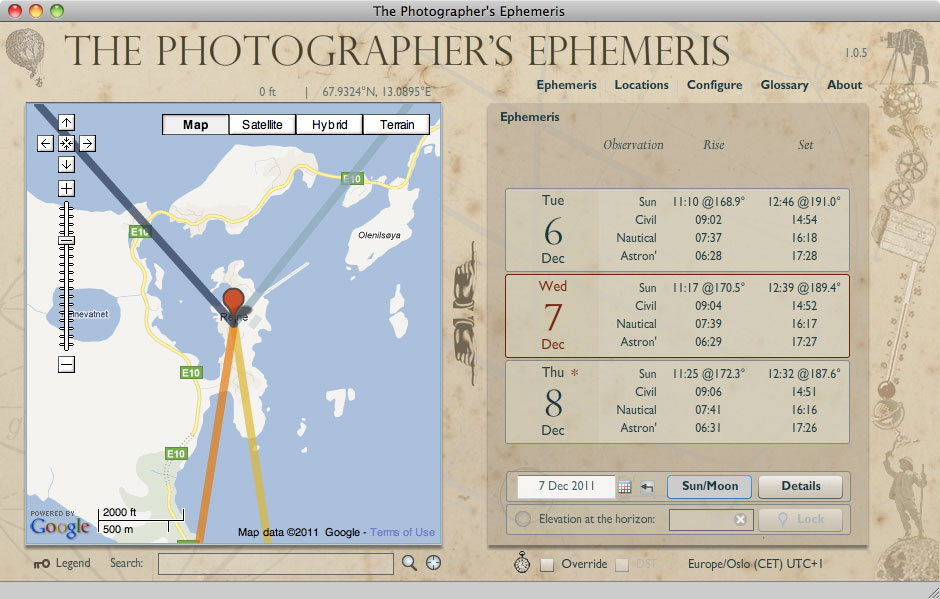
Looking at The Photographer's Ephemeris for mid December, I see that twilight begins a little before 9am (how civilised), and ends around 11am, giving me two hours to shoot in the moody light I like each morning and each night. Sunrise starts and 11am and Sunset is at 12:30pm, meaning the sun is above the horizon for an hour and a half. Twilight begins from 12:30 and ends around 3pm.

I don't know about you - but for me - this is a perfect photography schedule. Not up too early (I'm not an early riser by habit), and all the great light happens in a condensed period of time.

I can't wait.

PixelGenius - Sharpening

For years folks have gone on about the perils of sharpening images. Some completely over do it, while others don't do it at all. It is a religion for a lot of photographers, and I must confess, until recently, was one of them.

Way back when I first started using Photoshop, when I was a newbie to digital imaging, I would sharpen everything I scanned. It was exciting. It made the images look really impressive. What I didn't know at the time was that sharpening can have side effects on the quality of your images when it comes to resizing them at a later date. So as I became more aware of sharpening and its issues, I began to not sharpen anything at all.

For those of you who do not know what sharpening is, I must stress that it is not a feature that adds detail to any image. It is a feature that gives perceived improved resolution by adding contrast to the edges of objects within the frame. Over do it, and the picture can start to look hard. Halo effects can be introduced too if you're not too careful. IMHO, it takes a long time to perfect the amount of sharpening and ratio of sharpening effects that should be applied to an image. This is directly attributable to our ability to look at a photograph (it takes years to be able to read a photograph on a technical level) and also, the quality of the monitor we use to apply the sharpening with.

A few months ago, while I was researching printers and workflow - which I am extremely happy with, I was introduced to PixelGenius. It is a sharpening plug-in for Photoshop and it can help you make a good print an excellent print. It can also help you sharpen your images for the web too. I've had amazing results from using the product to sharpen for web and of course, with inkjets too.

Where I was once deadly against sharpening, I'm now all for it..... with some caveats:

1. My original files are left unsharpened. 2. I duplicate my TIFF scans and resize to the medium I want to use them for 3. I sharpen after resizing, not before

There are several reasons to use sharpeners such as PixelGenius. They help overcome issues with scanners and digital sensors creating soft images. In digital sensors, anti-aliasing filters soften the image to reduce moire patterns. Not all device captures are perfect, so Pixel Genius has three stages of sharpening:

1. Capture Sharpening 2. Creative Sharpening 3. Output Sharpening

As the names suggest, they have preset sharpeners for the capture medium. I use 6x7 medium format film, and I find the '6x6 positive film sharpener' fantastic for this.

The creative sharpeners are used in the same way we use dodging and burning. You dodge an image to bring prominence to that part of the scene and you burn in areas where you want to make the area darker and therefore lead the eye away. The same is true for sharpening. Sharpen the entire file and your eye may be distracted by objects that have too much detail in them (yes, that's right - too much). By applying creative sharpeners to certain areas of the scene, you can lead the eye towards, and also away from certain areas of the scene.

And finally, the output sharpening algorithms are fantastic for helping you get the best jpegs for web and the best results for sending files to your inkjet printer. If you're not doing anything like this, then your prints aren't half as good as they could be.

If you'd like to read more about Pixel Genius, then they have an excellent user manual which is available for free on their web site.

Sharpening is a creative part of the image making process. It is just as important as contrast masks and dodging and burning. By reading the PixelGenius user manual, you'll not only get a good education on sharpening and why you would want to use it, you will also get an introduction to a plug in that simplifies sharpening for you, making it easy for you to get great results, while cutting down the possible chances of making bad mistakes with your image editing.