Reciprocity Chart for Fuji Velvia 50 RVP

It's been a while since I wrote about this, and I've had a few people contact me about it. It seems that my original posting had lost some of the charts for reciprocity with Fuji Velvia, so I'm re-posting it here.

One of my most favourite things to do with landscapes is to collapse many moments in time into one frame. In other words, do long exposures. It can be extremely useful at removing textural detail that I don't need in the photo, as in the example below:

Removing textural detail by use of Long exposureFjallabak, IcelandImage © Bruce Percy 2017

Removing textural detail by use of Long exposure
Fjallabak, Iceland
Image © Bruce Percy 2017

By removing any small currents in the water, I've removed any possibility of the eye being distracted and therefore drawn to it. Similarly the long exposure has reduced the chance of the sky having anything of distraction in it either. So my eye is allowed to go straight to the headland. 

Using long exposures in this way can remove distractions and allow (in this case) areas of the picture to become 'wallpaper' - regions where your eye just floats over the surface. 'Wallpaper' is an integral component of most photographs: there are always going to be areas of the picture where you wish for the viewers eye to float freely without getting trapped or stuck.

By smoothening any textural details out of these regions of the frame, I can also allow the viewer to see the gradual tonal shifts that underpin the area. For instance, if you look at the water, the tones get darker as we move towards the bottom of the frame and the eye enjoys seeing smooth gradual shifts.

Similarly with the sky I've adopted the same approach, which is perhaps a point on its own: if you have clouds, do you need them? Often I'm wishing for skies with either complete cloud cover (for softer light all-round), or to reduce textural detail in the frame. I will deliberately go to certain places at certain times of the year because the skies are clear of clouds (Bolivia for instance) otherwise there is perhaps too much information or 'things' for the viewers eye to get stuck at. We're back to talking about tones and form. Too much form and we have too much distraction. So I'll often use a long shutter speed to smoothen out the clouds in the sky.

If you're a film shooter - which there is a good chance you might be in 2017, since I've begun to notice over the past few years that around 2 people in every group of 6 is a hybrid shooter (film and digital), then doing long exposures require the need to calculate reciprocity.

Just in case you don't know what reciprocity is, I'll explain. When shooting film, most folk think that the relationship between the shutter and aperture remain constant. They don't. As you get down to longer exposures, film loses it's sensitivity; and the relationship between the shutter speed and aperture begin to drift apart. Typically once you get past 4 seconds with Velvia. Which means that if you rely on your meter, you're going to underexpose your images. So you need to compensate.

I didn't use a long shutter speed here. It was a very calm evening and the only possible textural distraction would have been in the reflections of the mountains. I felt using a long shutter speed was a case of diminishing returns: not required. So …

I didn't use a long shutter speed here. It was a very calm evening and the only possible textural distraction would have been in the reflections of the mountains. I felt using a long shutter speed was a case of diminishing returns: not required. So rather than use long shutter speeds all the time to smoothen things down, get used to 'reading' your landscapes - watch them to see how dynamic they are.

It's very easy to get into the realm of long shutter speeds if you are shooting in low light or with some ND filters applied. With Velvia, if your meter tells you the exposure should be 4 seconds and beyond, then reciprocity needs to be applied.

Here is a table of corrected values:

4s becomes 5s
8s becomes 12s
16s becomes 28s
30s becomes 1 minutes 6s
1 minute becomes 2 minutes 30 seconds
2 minutes becomes 4 minutes, 50 seconds

And you shouldn't need to go beyond that, as the contrast will get too high and the colours too funky.

Either write them down, or better - remember them. I used to have them on a little laminated card for the first few years of shooting, but the corrections have now been memorised. That's one of the beauties of staying with a single film type for most of my photography career. The less variables I have to my 'process' the more second-nature things become.

Working on some new images

  Just a short post today. I'm entrenched in my home studio, busy working on a massive backlog of images from the Bolivian altiplano and the Chilean Atacama desert.


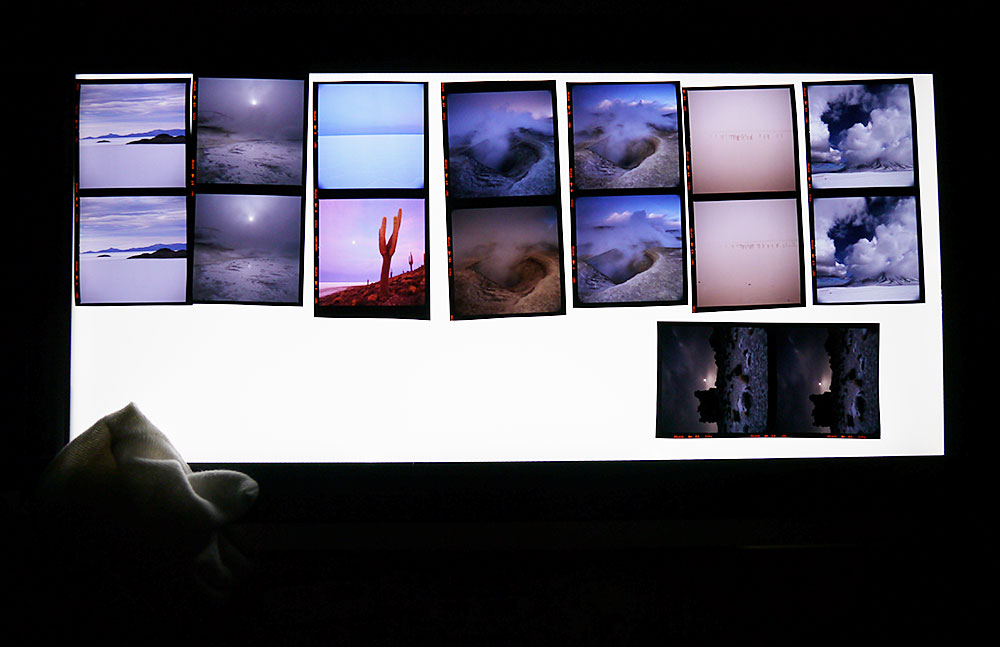
I thought it would be fun to share with you an image of my beautiful Gepe light-table. I love working with transparencies, and laying them out in a collection like this.

I can 'see' the portfolio coming together a little more clearly when I do this. I'll sometimes pick out the best images from my sheets of Velvia 50 to scan, before I go back and have a bit more of a detailed review of what else is there. It really depends on how i'm feeling. Other times, I'll work systematically through each sheet of film one at a time, until I've garnered all the good stuff. On average, there tends to be around 2 images a sheet (10 shots) that I like, and want to scan.

I  love how transparencies have the colours already 'programmed' into them. Velvia is a highly saturated film, so I tend to work the opposite way to most Raw shooters - rather than adding in the colour, I tend to scan and then decide which colours (if any) require desaturating.

If you click on the image above, you'll see a higher resolution one.

For those of you who have never shot film, or transparencies, you're missing out on one of the most satisfying parts of creating images: that of laying out your transparencies on a light table. There's something about the tactile aspect that I think lends some kind of emotional investment to the work.

As for viewing the images on the light-table, the colours just glow - this alone can provide ample inspiration for the editing stage, and I'll often find myself feeling very excited as a result.

From left to right: Salar de Uyuni, Sol de mañana geyser basin, Pescado Island, Sol de mañana geyser basin, Flamingos at Laguna Colorada, Atacama Chile, Little Italy stone desert Bolivia.

Quality Control

I've just finished editing my images from the Bolivian altiplano and here is a contact sheet of the final 40 images I'm happy with. I was thinking today about how I love the entire creative process: you start with nothing and even trying to visualise what you may come home with is often nowhere close to what you end up with. There's that element of the unknown about the creative process that is intriguing.

contact

But there are some factors which can heavily influence the outcome of a body of work. I don't have a 'formula' as such and tend to like just 'going with the flow' and seeing where my editing will take me. But here is a rough outline of what happens for me:

1. I get home with a massive pile of films processed. I don't look at all of the sheets in one sitting because I'll be overloaded with the need to work on too many images.

2. I'm patient. Good work is not rushed and rome wasn't built in a day. So I just consider that each image takes time to be born correctly, and if there are golden nuggets in the pile of transparencies I have, then I will find them : at the right time, when I'm in the right mood to approach them correctly.

3. Sometimes I'm not sure how to approach an image, how to edit and this can be when I'm tired, done too much editing, or I'm simply not feeling inspired enough. Taking a break, heading outside for a walk, a cycle, or doing something else with my life completely seperated from my photography is the only way of approaching my images with a fresh and keen eye.

4. I work on a sheet at a time. I don't peek to see what else I have. I take each contact sheet on it's own merit and work on the best images from that sheet. This allows me to find images that I'd easily forget about if I found something better underneath.

5. I ruthlessly throw images away. For instance, on a contact sheet all the shots of the same location may be excellent, but there may be one or two that stand above the rest. Those are the two images I will work on. The others are stored away, but not used. If an image is not working, and I've tried a few things, given it some space, etc, then it will be discarded. If there is a glaring problem with focus for instance, then it is discarded. If the composition just isn't working, and no amount of cropping helps - then it's discarded. Sometimes I have a nice image, but something causes it to be discarded because it's simply too much effort to get it right. Good images should not take a long time to edit. They should just come together smoothly.

6. Quality Control. Ok, so I have say 40 rolls of film, each with 10 images on them - that's 400 images. I'll edit it down to around 80 images. Those that are really standing out mixed with those that are nice. Some may stay because I want to show an aspect of a location that is not already covered by the proposed final portfolio. But I will keep editing down, until I have a smaller number of images. If you want to be a good photographer, you have to be objective about your work and maintain a certain level of quality. Only release what you are truly happy with (unless you suffer from very high expectations in which case you are in trouble).

7. Be kind to your mistakes, try to see the images as someone else would. Some flaws are acceptible, and if the image still conveys a spirit or 'feeling' that you like, even though it's slightly blurred due to camera shake - then it's an image that still works. Images should be read on face value. Pixel peeping is not a productive activity. See the wood, not the trees.

8. Live with the images for a while. You get a sense of distance from the whole process and can then be more objective about your work.

I've taken around three weeks to produce 40 images. To some digital shooters, this is not a way forward, but for me : it IS the way forward. Good images, ones that I can live with and feel close too, can only be born correctly if I am receptive and nurtiring with what I do.

El Arbol de Piedra

On the Bolivian Altiplano, I photographed El Arbol de Piedra (the stone tree) around 6am. el-arbol-de-piedra

I had to retreat to the 4WD and sit in the warmth because my hands had gone so cold that they had become unresponsive. I couldn't operate my camera. It was a stunning revelation because I wasn't aware of it being cold. I'm not sure if this was because I was suffering slight altitude sickness problems anyway, but at the time I thought it was just that temperatures at higher altitudes just 'felt different' from the cold I know so well in a Scottish winter.

I dug out the contact sheet of film yesterday and this was the one that really stood out. It was shot a little bit earler than the rest and the light was just a bit more magical. Wish I'd laid off on the polariser though, but all the same, I'm happy with this shot.

Dali was apparently inspired by this very location and now that I've been there, I can exactly see how.

I shot this with a Mamiya 7 and I can't remember if it was wide angle (50mm) or standard (80mm). But I do remember not using a Grad filter because I found that the landscapes in Bolivia seemed to have the same luminance as the skies did. I don't know why that should be.

Just one of the many strange things I found different about shooting this landscape, compared to any other I've done so far.