This is an old post from Jul 2016. But it still holds true. I thought it might be good to re-post some of my earlier entries as there is a lot of still valid information hiding in my blog.
I hope you enjoy this article, and it makes sense,
Bruce
—
Why grads are still required
I find it very interesting that it's completely impossible for us as a species, to see true dynamic range. We don't actually see the world the way it really is - our eyes compress luminosity so that everything in the upper regions all looks the same:

The human eye compresses luminosity. In other words, we are unable to see true dynamic range. It is a physical impossibility. Digital cameras can however see the true dynamic range. Even so, just because they can, does not mean they render images the way we see them. We need to use grads to do that.
We are in fact, all blind to true luminosity in the real world. Whereas digital cameras aren't: they are able to see that the sky is 4 stops brighter than the ground. But just because they can see it - it doesn’t mean digital cameras are giving us what we want. It just means that digital cameras don’t see the way we see. And that’s the important bit.
We tend to view everything we look at, as a mid-exposure. When I look at the sky, in my mind I see a mid-exposure of it. And when I look at the ground, I see a mid-exposure of it also. As my eye scans around, I build up an internal representation of the world - a collage or collection of mid-exposures.
This is why I don't agree with the concept that 'if a scene can fit inside the entire histogram, then we don't need grads'. This belief, lacks understanding of what it is we are trying to do with grads in the first place and also what a histogram represents.

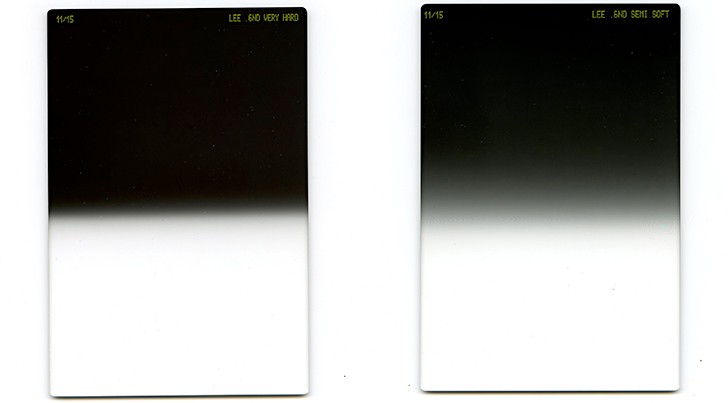
Image shot without a grad. Sky is overexposed while ground is underexposed. Although it is contained within the histogram, and is a true representation of what is there, it does not match how the eye perceives the scene (the human eye compresses dynamic range whereas digital cameras do not),

With a grad in place, the dynamic range of the scene is reduced - but not only that - the ground values move towards the mid-tone area (right) of the histogram, while the sky tones move towards the left (mid-tone) area of the histogram. Giving an image that is closer to how our eye sees.
In the images above, the left-hand one is an example of what happens when I don't use grads. The image may well 'fit into the histogram', but the ground is underexposed and the sky is overexposed:

The left-hand side of the histogram represents dark tones while the right-hand side represents bright tones. I now have a muddy underexposed ground (left-hand side of the histogram) and overexposed sky (right-hand side of the histogram).
So everything fits, but the image sucks.
And the thing about histograms is: Just because you have the space - it doesn't mean you have to fill it.
The problem is, my eye doesn't see the ground as a dark area, nor the sky as a bright area. My eye tends to perceive them both as similar to each other and as a mid-tone. So if I wanted my histogram to represent what I saw, I would expect to see a 'single humper' histogram like this one:

One where the ground is a mid-tone and the sky is a mid-tone too. In effect, the ground and sky would share the same area of the histogram.
And that's where grads come in, because they do this for us. They not only push the sky from the right side of the histogram to the middle tone, they also move the ground from the left side of the histogram towards the middle tone. Yep, grads not only darken the sky - they also brighten the ground because they reduce the dynamic range or width of the histogram. Since your camera is always aiming for an 18% mid-tone, everything moves towards the middle: sky goes left and ground goes right.
Again: just because you have the space - it doesn't mean you have to fill it :-)
If you do choose to use grads, there are a couple of benefits to using them:
1) You will have more space in the left-hand side for more shadow tonal information. When you don't use grads and squeeze everything into the histogram you push the ground to the left - and underexpose it. And when underexposing - you tend to compress (or quantise) different lower tones into fewer tones. Twenty discreet tones are summed into one or two tones. However, If you use grads, you open up the shadows by moving the ground towards the middle area of the histogram and this compression becomes less of an issue.
2) Conversely, the same is true for the sky. You have more space on the right for more tonal gradations and you record more tonal graduations. If you didn't use grads - many of the brighter tones are squeezed together or quantised - several tones become one in an attempt to fit it all into the dynamic range of the camera.
3) If you use grads the RAW image doesn't suck so much to look at.
Point 3 is perhaps the most important one for me. If we put all the science to one side, I'd much rather come home with something that already looks inspiring to work with. A more balanced exposure through the use of grads will do that for me. I wish to be engaged when I review the RAW files, I don't wish to have to think about jumping through some additional hoops before I can figure out if there is anything of value there. If I don't use grads, I may let a few images fall between the cracks if I have to do additional processing before I can visualise if the image holds promise.
So for me, coming home with a more pleasing balanced image that requires less work to see if there is potential, is the most important aspect for using grads.
But that's just me. Which of the two images above would you choose to come home with?