Manual or Aperture Priority?

This is a re-post. This article was published February 2020. I’m going to re-publish articles from my extensive blog as I think many of them are still relevant.

This article deals with using Aperture Priority along with grads to work out your best exposures. I’m aware that many use manual, but if you read below, you may see why I think AP is a good mode to work in.

Each year I get participants using Manual mode for almost everything they do. Today I’d like to cover why for me I would tend to use Aperture priority (along with exposure compensation) for most of my work. The only caveat about this is that when you get into very low light situations, most cameras prefer to work in Manual. They somehow fail to be able to give sensible readings in AE.

My main reason for using Aperture Priority above anything else is mainly due to this:

‘when using grads along side aperture-priority,
the camera automatically re-balances the exposure’

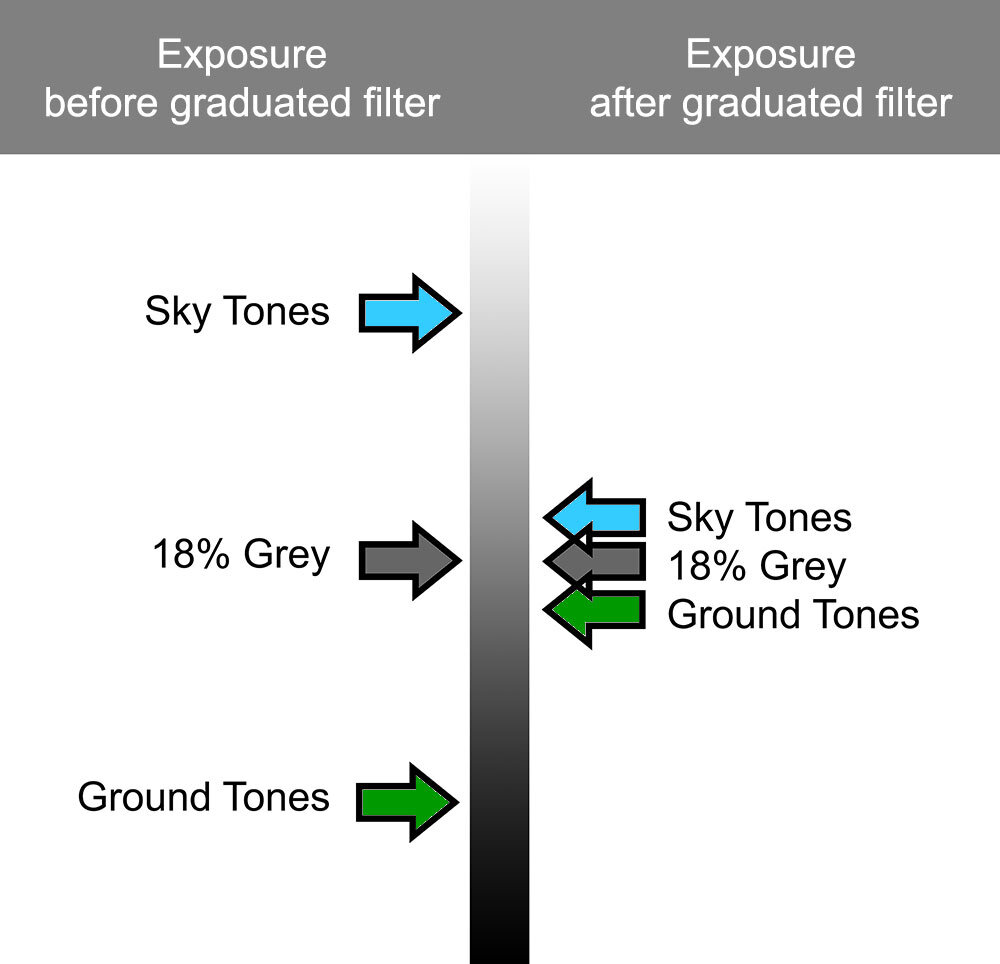
Consider the diagram below. On the left I show how the exposure of sky (blue) and ground (green) are worked out. Bear in mind that the light meter inside your camera just sums up all the tonal differences and takes an average (if you’re not clear on metering, see the previous article Light meters are dumb, they just try to turn everything 18% Grey).

exposure-grads.jpg

The main point about this diagram is:

  1. Before applying a grad, the camera just has to take an average between sky and ground. So the ground is underexposed and the sky is over exposed.

  2. When applying the correct strength of grad, the sky gets darker (as we have been taught - this is what grads do - they darken the sky). But something else happens as well………

The ‘something else that happen as well’ is this:

  1. The ground gets lighter.

Why is this? Well if you study the diagram, and think about it for a little bit, you can quickly see that if you apply a grad, the difference in stops between the sky and ground is reduced. Since the camera’s light meter is looking for an average, the new mid-point is much less further away from the sky and ground tones. In other words, the contrast range has been reduced and the light meter just picks a new average between the new light and dark tones.

When working in Aperture priority, the average exposure is being computed in real time. You can even see it adjusting the mid-point exposure as you push a dark grad down on the frame. As you do so, the ground gets lighter, because the difference between sky and ground is reduced.

This doesn’t happen in Manual. You don’t give the camera a chance to automatically re-balance the exposure for you.

Manual isn’t always the way to go

For me, I would shoot in Aperture Priority for most of my work. I’d prefer to do this because each time I apply a grad, the camera just recomputes, and works out the new average meter reading for the scene.

Before I am shot to bits by people declaring that I think Manual mode is bad. I’d like to make very clear that Manual still has its place. Often times when working in very low light, most cameras give up metering in Aperture priority, and so I have to resort to using Manual for these times.

It’s just that in Manual, you don’t see the ground lifting up in value when applying the grads. So I prefer to use Aperture Priority when I can.

Aperture Priority + Exposure Compensation

If it were me, all cameras would be designed to have just these three elements:

Aperture Priority
Exposure Compensation
Manual mode

Because most of the time, aperture priority with a bit of exposure compensation is all that’s required. Sometimes I need to go longer than 30 seconds, or need to set up the camera is very low light, so I’ll resort to Manual.

Grads are still valid

If you’re a digital shooter that believes you don’t need grads, I’d like to urge you to think again. There are many benefits of working with grads:

  1. As pointed out above, when you use a grad to darken the sky, you also lift the tonal values in the ground.

  2. You get more shadow information in the ground

  3. The negative you come home with is more pleasing to work with. It requires less effort in processing to figure out if it’s any good to begin with

  4. Working with nicely exposed negatives is much more inspiring that working with negatives that need a lot of massaging in post.

  5. Are you really going to process ALL of your digital files to see if they turned out well? I doubt it. How can you tell if the image is any good when the sky is bleached out and the ground is muddy?

For me, points 1, 2 and 4 are perhaps the most important for me.

Grads still have a place in digital photography

Today I’d like to discuss the validity in still using Grads in an age where digital cameras have so much dynamic range that many believe that grads are no longer required. To do this, I need to go over what happens to the exposure when we apply grads.

Yesterday I discussed why using Aperture Priority is better than using Manual, particularly when using grads. Aperture Priority automatically re-balances the exposure as the grad is applied:

exposure-grads.jpg

As you can see, the grad reduces the difference in contrast between sky and ground. And since the camera wants to take an average between the two values, we find the sky and ground moving towards mid-grey (18%).

In the above illustration you can see that the ground values are now lighter once the grad has been applied. This is key to my post today. When you apply grads, what you are essentially doing is opening up the shadow detail in the histogram / exposure of the photo.

sky-ground.jpg

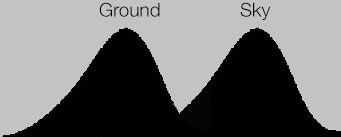
Consider the histogram on the left. No grad was applied, so we end up with a classic ‘double humper’. The ground has been squeezed into the lower tones of the histogram while the sky has been squeezed into the upper registers of the histogram.

Note where 18% grey is.

The ground is essentially underexposed, while the sky is overexposed.

Also consider that the ground is residing in the shadow ‘darker’ area of the histogram. This results in loss of tonal information in the shadows as many dark tones are being quantised. Many tones become one.

Now let’s consider the same image shot with a graduated filter:

sky-ground.jpeg

The ground values have been moved towards the middle area of the histogram. Same for the sky values. The important points to consider are:

The shadow information has been opened up (marked in red). We now have more tonal information stretching over a longer tonal scale way down into the shadows.

The highlight information has also been opened up (marked in red). We now have more tonal information stretching over a longer tonal scale way up into the highlights.

For me, the main reasons why I use grads are:

  1. I wish to avoid underexposed ground and overexposed sky

  2. I want to go home with a pleasing negative to work with.

  3. I don’t want to have to jump through additional hoops in the processing to figure out if the image is any good. Working with an image where the sky is overexposed and the ground is underexposed isn’t very inspiring at all !

  4. if I didn’t grad, I’d have to process every file I shot to see if they were any good before I began work.

  5. Working with a nicely balanced exposure straight out of the camera can be, and often is, a very inspiring way of working. You can see straight away whether the composition and image works or not, and I remain engaged.

Engagement is the key for me.

I don’t want to struggle with bad exposures to make them nicer. I want to work with images that inspire me, and that means pleasing, balanced exposures.

If I go home with a nicely balanced exposures, I am more likely to work with them. Conversely, having to trawl through hundreds of images with dark foregrounds and bleached out skies wondering if they might be good once I’ve put them through my editor of choice isn’t going to fuel my creativity. And it’s certainly not going to inspire me.


Light meters are dumb, they just try to turn everything 18% Grey

This is not a complaint. It’s just a fact. And something we all need to understand about light meters.

Here are some fallacies:

  1. There is such a thing as the correct exposure

  2. Metering something gives its correct exposure

Here are the truths:

  1. Metering something gives the exposure values to turn it 18% grey

  2. You choose which part of the scene is turned 18% grey, and let everything else transpose around that.

Why 18% grey?

There are a number of reasons for why 18% grey was chosen:

  1. A light meter has to set the exposure for something. So an average value is as good as any. Most things look about right when exposed as an 18% grey subject.

  2. The human eye perceives most things as a mid-tone.

With point 2, let’s consider this some more. If you point your camera down at the ground and take a shot of your feet, and check the picture, the image will look about right. If you also check the histogram it will be right in the middle of the graph. The shot has been exposed as an average (18% grey) and it looks about right. Now do the same with the sky. Point the camera right up at the sky so the entire sky fills the frame and take a shot. The photo will look about right, and guess what: the exposure will be right in the middle of the histogram. Another 18% grey exposure.

So the human eye tends to perceive most things as an exposure around 18% grey. Knowing this, and also knowing that your light meter is trying to turn everything 18% grey is useful.

For me, all I need is Aperture Priority and Exposure Compensation. When shooting a scene I let the camera work out the average value (18% grey) and if I feel it’s underexposed (as will happen with snow white scenes as the camera tries to make the snow 18% grey) I can apply compensation of maybe +1 or +2 stops.

Exposure is pretty simple. Camera light meters are really dumb. They just try to take an average all the time and make the scene 18% grey. There is no such thing as ‘the correct exposure’, and the meter reading you get is the values you need to turn the subject 18% grey. That’s all a light meter does.

Working out exposure for transparency film

 I was asked if I'd write a blog entry about how I work out my exposures. Bear in mind this is just my own take on it, and although it works for me, there are many other ways of doing this. So I'm not suggesting this is the only way, or the correct way, but it works for me. Also, before I begin, please know that I am 100% a film shooter. This is how I work out my exposures for Fuji Velvia film only (it's the only transparency film stock I use).

Velvia 50 transparences on my light table.

Velvia 50 transparences on my light table.

So here goes. Before I discuss exposures, let's do a bit of ground work and cover some basics. Here we go:

  • When you add 1 stop of exposure, you double the amount of light hitting the sensor / film.
  • When you subtract 1 stop of exposure, you half the amount of light hitting the sensor / film.
  • Therefore, exposure is a case of doubling or halving values.
  • Ansel Adams had the zone system (10 zones) which mapped to 10 stops.
  • With Velvia transparency film, the latitude of the film is only maybe around 3 to 5 stops. In those 3 or 5 stops you get 10 zones. So the way I work it out, is I assume that Velvia has a latitude of 3 stops, and that means I roughly allocate three zones of Ansel's system to one stop. I've never found that adding +3 stops to make snow white has every worked for me. It's always a case of adding +1 stop only.

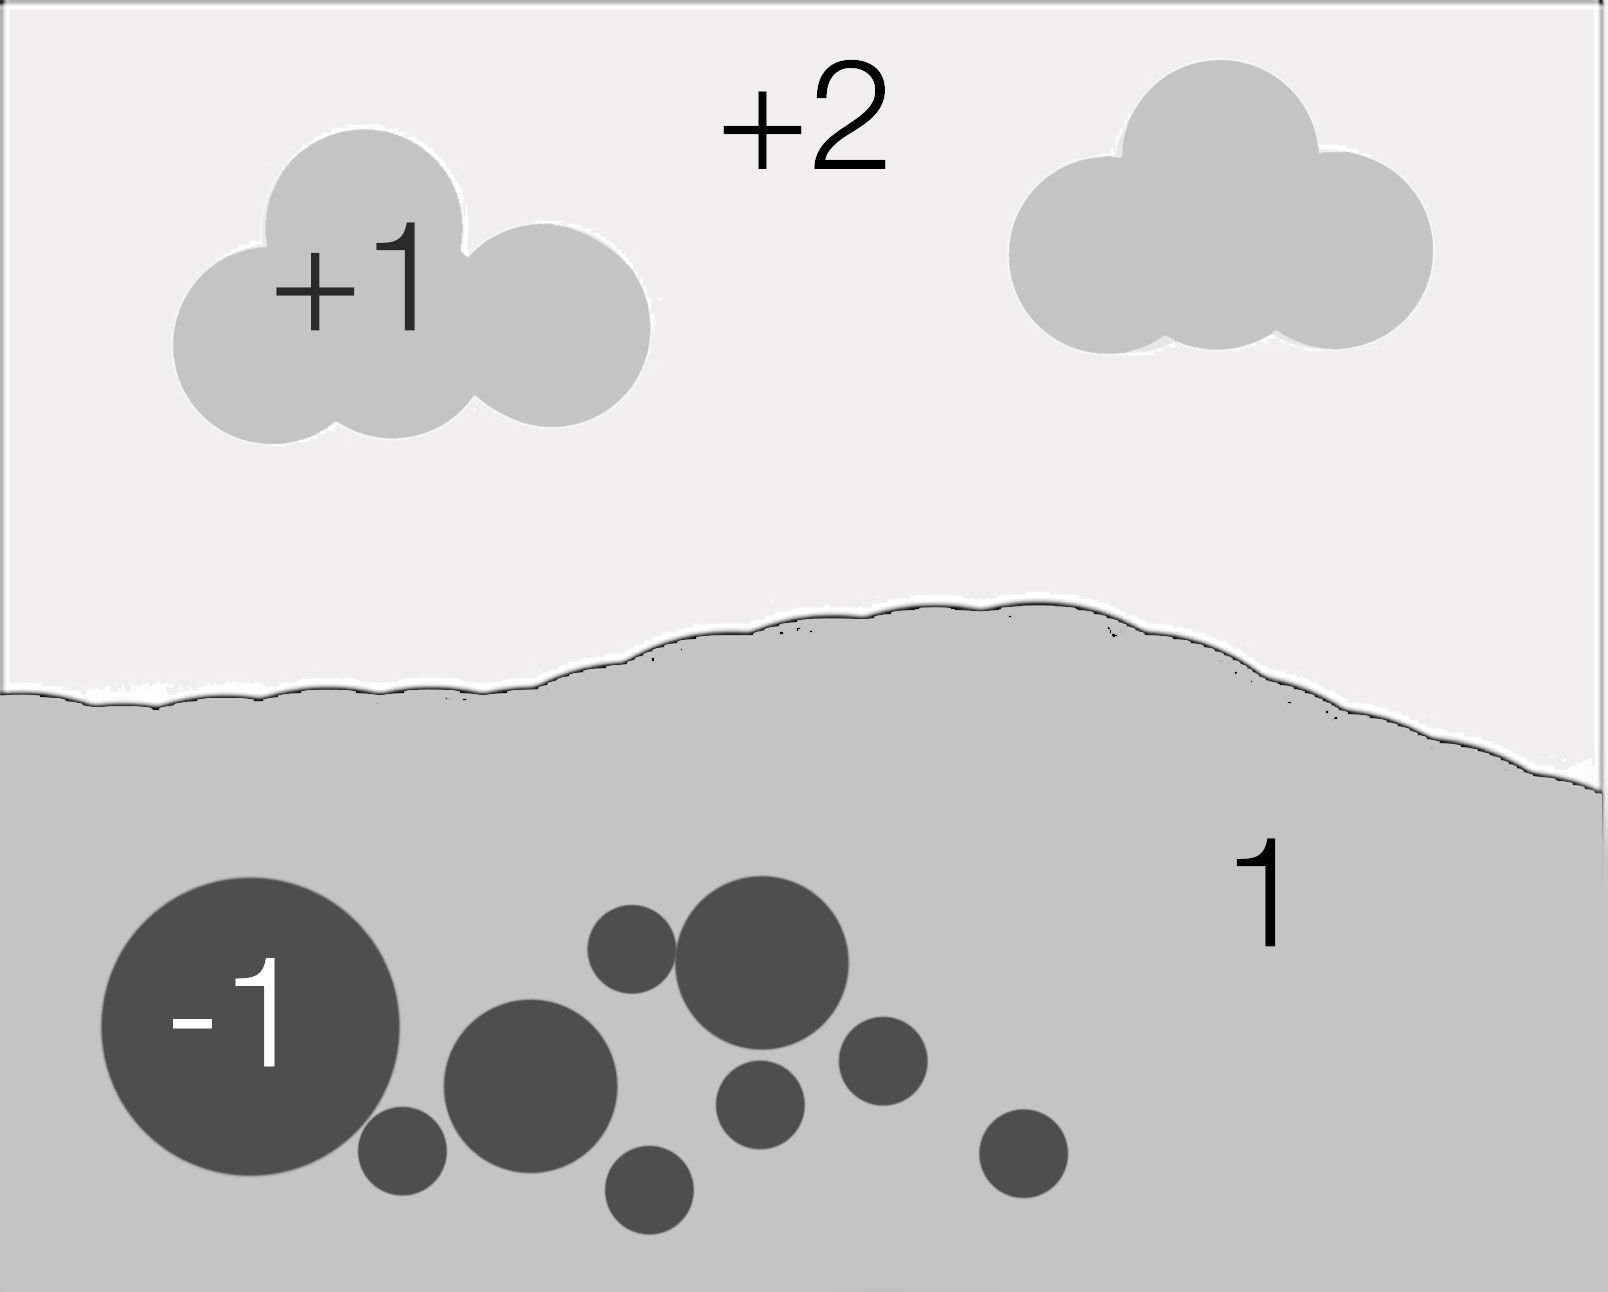
I've constructed a simplified diagram below of a landscape. In it, we have the ground (I've chosen to use this as my  exposure point (18% mid grey) and therefore it has zero stop difference. Everything else in the diagram has it's difference in stops detailed - in comparison to the ground. In effect, the ground is our 'reference' point for everything else in the scene. This is pretty much what I do most of the time - assume my ground wants to be exposed at 18% grey, and work out where everything else is in relation to that, and also how much grad I will require to ensure the sky does not blow out.

About metering - 18% Grey

With metering, you should also know that the reading you get, is what it takes to make whatever you measured mid-grey (18%). Meter a white door and the reading you get is what it will take to turn that white door mid-grey. Meter a black door, and the meter will tell you what it takes to turn that black door mid-grey. So whatever you point the meter at - it's telling what exposure you need to turn the subject mid-grey, and you need to apply a degree of compensation to it to make it turn out how you think it looks.

For example, if I want a white door to be white, I will apply +1 stop exposure compensation (with Velvia, that's sort of like zone 8 in Ansel's terms). To turn the black door black, I will need to underexpose by -1 stop (turning zone 5 into zone 2).

Spot Metering a Scene

In the following illustration, I've broken down a scene into it's exposure components by stops.

Scene as is, before doing anything.

Scene as is, before doing anything.

In it, I have:

Ground, used to set the exposure so there is zero stops difference here.
Sky +3 stops brighter than the ground
Clouds +2 stops brighter then the ground
Black rocks -2 stops darker than the ground.

Grading the Sky to similar luminance as ground

I've worked out that I want the clouds to appear the same tone as the ground, so I'm going to grad the whole sky by -2 stops, therefore reducing the clouds to the same luminance as the ground, and also reducing everything in the sky by 2:

After applying a 2-stop grad

After applying a 2-stop grad

In the above diagram I have graded the sky by 2 stops. The white areas of the sky are still at +1 compared to the ground and that is fine with me, as I know Velvia can handle this. 

Where to set the mid-tone?

But what you should be asking yourself is whether setting the exposure for the scene on the ground values is correct. Depending on the luminance of the ground, I may wish to apply some exposure compensation to render the ground the way I perceive it.

Bear in mind that when taking a reading, you are asking the meter to tell you what exposure setting to use to turn the subject 18% grey. I've found that the following ground conditions require different amounts of compensation:

  • Sand (+1 exposure compensation)

Although it looks grey in colour or may appear mid-grey, Sand is actually brighter than 18% grey so if I meter sand and want it to come out the way I see it, I have to apply +1 stop exposure compensation.

  • Grass ( 0 exposure compensation)

Grass is 18% grey, so metering it gives me the correct value to render it the way I see it.

  • Stones (+1 exposure compensation to -1 exposure compensation)

Stones vary in luminance. Black stones need to be rendered at -1 exposure compensation while most 'mid-grey' stones require +1. We tend to perceive brighter objects as less bright. So a stone that is brighter than 18% grey is often perceived as 18% mid grey when it's not.

So to set the exposure on my scene, I really need to consider the luminance values of the ground, and I will often use grass as a correct reference point, but if there isn't any available, I know that sand will require +1 exposure compensation.

Applying +1 exposure compensation. Everything is transposed +1 stop

Applying +1 exposure compensation. Everything is transposed +1 stop

In the above diagram I've applied +1 exposure compensation, which means the entire scene has been brightened. This means that the ground is +1 over 18% grey, and the black rocks in the foreground are now -1 stop below 18% grey. The sky is +2 stops over mid-grey which is fine as i know Velvia has enough latitude to record this.

Re-balancing the scene - applying different graduation

However, I'm now thinking that since I have:

  1. Applied a 2 stop grad
  2. Applied +1 exposure compensation

The grad is not as effective as I would like it to be. Pushing the exposure +1 has reduced the strength of the grad from 2 stops to 1, from where we started. So I'm going to take out the 2 stop grad and replace it with a 3 stop grad:

Replacing the 2 stop grad for a 3 stop grad.

Replacing the 2 stop grad for a 3 stop grad.

So I've left the ground exposure untouched. It is still at +1 exposure compensation, but i have brought the luminance of the sky down by a further stop so it is now -3 from its original position. But bear in mind although it is graded 3 stops, I have applied exposure compensation to the entire scene of +1 which means the grad is only really reducing by 2 stops (-3 stops +1  = -2 stops).

Before and After

So let's now compare what we started with, and where we needed up. In the two diagrams below, I do just that:

Initial scene with exposure set to the ground.

Initial scene with exposure set to the ground.

Final exposure with 3 stop grad applied and +1 exposure compensation applied to whole scene.

Final exposure with 3 stop grad applied and +1 exposure compensation applied to whole scene.

A word about histograms and exposure

Before we begin to look at the difference between the initial exposure and the final one, we must first consider how the human eye sees tones.

In a nutshell: we perceive every tone out there as a mid tone. To test this out, if you point your camera at the ground so it fils the entire area of the image and take a shot, the ground should look correctly exposed. The histogram will show you an exposure right in the middle, which suggests we perceive the ground as an 18% tone. Now do the same for the sky - point the camera completely up into the sky and take a picture. It too will look correct even though the histogram is in the middle and the sky is now 18% grey.

We perceive everything more or less as sitting in the middle of the tonal range. In fact, human vision is incapable of seeing true luminosity and we tend to compress the higher tones so we see the same thing.

When I am making exposures, I am attempting to move the ground towards the mid-tones of the histogram and I am trying to move the sky towards the mid-tones of the histogram too.

This is very important and I would read this again:

"When I am making exposures, I am attempting to move the ground towards the mid-tones of the histogram and I am trying to move the sky towards the mid-tones of the histogram too."

If we look at the scene after I've applied my 3 stop grad and added +1 exposure compensation, this is exactly what I've done: I've lifted the tones in the ground by +1 stop and reduced the sky tones by -2 stops. This can be seen in the following histograms:

Original exposure with no grad or exposure compensation applied. Ground is underexposed, Sky is overexposed.

Original exposure with no grad or exposure compensation applied. Ground is underexposed, Sky is overexposed.

After applying a 3 stop grad and adding +1 exposure compensation, I've brought the ground and sky tones towards the middle.

After applying a 3 stop grad and adding +1 exposure compensation, I've brought the ground and sky tones towards the middle.

The histogram on the right is what we should be aiming for. This is for a few reasons:

1) The ground has been moved towards the mid tones
2) The sky has been moved towards the mid tones
3) The scene is now 'balanced' and looks like what we see with our own eyes

But also, here are a few important things to consider that you get with your histogram on the right, which you lose with the histogram on the left:

1) You open up the shadow detail. There's more tonal information in the shadows
2) You open up the highlight detail. There's more room for the brighter tones to stretch out across the histogram.

When you don't do this, and end up with a histogram as you see on the left (I call it a double humper), you get the following problems:

1) You lose shadow detail because all your lower tones are squashed into the bottom left of the histogram and quantisation occurs - many tones become compressed into one single tone. You lose tonal detail and no amount of correction later on is going to recover that for you.
2) You lose highlight detail because all your higher tones are squashed into the top right side of the histogram.
3) You have to do more drastic editing when you return home and scan the films.

So when someone says 'I've got it all in the histogram', this may be OK for digital capture (well, it's not really), but for film it's not ideal at all. You still go home with an underexposed ground and an overexposed sky. Trying to recover shadow detail in film is a nightmare (and almost impossible with transparency film) and likewise turning down the overexposed sky brings out funky crossover effects and often I find the grain in the film becomes very evident due to drastic curves adjustments.

You need to balance the exposure in-camera. Even if you are a digital shooter this is still what you have to do and I don't subscribe to the idea that digital cameras have 12 stops of dynamic range so grads aren't required. They are still required for all the  reasons pointed out above.

To finish up

Working out exposures in the field for film using a spot meter may sound complicated, but it really isn't. It's just a case of practicing.

I love spot metering my scenes. I also love not seeing what I'm getting. Using film means I have to construct the image in my mind's eye. What I like about this approach, is that it has taught me to really think about what tones are present in the scene. Through practice, I now know that black rocks are hard to record, and that I really need to lift the tones in the ground up towards the mid-tone or above it, and reduce the sky down towards the mid. This is not simply because the dynamic range of my film is limited (it's is a concern, but not the main reason). The reason is that in order for the scene to be truly balanced the way my eye sees it, I need to move everything towards the middle of the histogram. That means reducing dynamic range and shifting the ground to the right and the sky to the left.

The simplified version

Ok, that was quite long, and perhaps quite difficult to take in. So here's a simplified version:

  1. Meter the foreground and then meter the sky and work out how many stops difference there is and apply a grad for those number of stops.
  2. If the foreground is brighter than 18% grey, apply +1 exposure compensation

Or....

  1. Work out the difference in stops between ground and sky and apply a grad for the difference.
  2. Make  two exposures. One with no exposure compensation and a second one with +1 exposure compensation applied.
  3. Go home and study the films.

-8 EV Exposure Meter

I've been thinking of doing some night photography in Venice later this year. From what I hear from a few clients of mine who have either lived there or know the place well - it's almost impossible to shoot Venice during the day because of all the tourists. Night time is best. My trusty Sekonic 758DR light meter is hopeless at metering in the later stages of twilight.

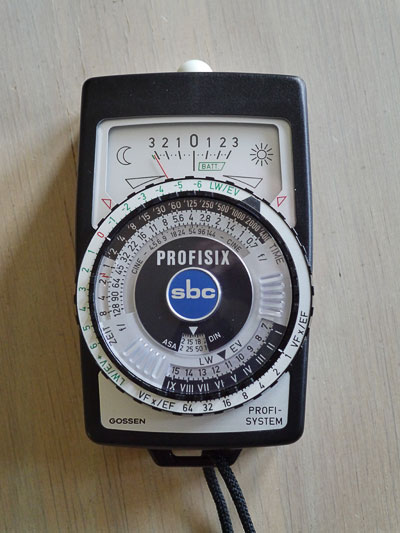
Gossen Profisix

So this week I managed to find a Profisix SBC exposure meter on eBay. I've been looking for one (very casually) for a few years. I first saw one on my very first workshop in Scotland. A Danish client showed me it take a meter reading towards the edge of twilight and night. I was impressed to see his meter tell him an exposure reading of 15minutes. Reading up on the light meter, I found out that it reads down to -8 EV. That's quite an achievement considering that my Sekonic light meter only reads down to about -1 EV - if that. I often find my Sekonic fails to read anything at all once we get in to the later stages of twilight, when most digital cameras seem to be able to read into what feels like absolute darkness.

Of course, moving to a digital system for this kind of thing would be highly advantageous. If the exposure is wrong, we just check the histogram and apply exposure compensation in degrees of 1 stop increments. Think of it this way - adding some arbitrary number of seconds (say 10) onto a 60 second exposure makes very little difference (it's only a 1/6th increment). So it's best to apply method to your madness, and increase the exposure by a stop at a time (double the exposure time) until the histogram is showing you a better distribution of tones.

But I've been using film for around 25 years now. I don't intend to stop, because I love the look of the medium. I also love the surprise element of what I'm getting. There's a mystery to what is being captured on my film: with no preview screen, I have to 'preview' in my minds-eye. I've said for a very long time that I find this a very satisfying way to work: my imagination is given a bit of  a work out, and I feel this really has, over the years, helped me keep a strong sense of visualisation.

Now, I just need to go and book those flights to Venice.


Do we really need High Dynamic Range?

Disclaimer: This was originally posted in 2013. I've updated it. 

Before I begin this posting, I wish to stress that this topic is specifically about landscape photography. I do believe high-dynamic-range is a feature much needed in many realms of photography. I've put this article together to really play devils advocate, and to hopefully make us think more about what we know about light, and whether working with narrow dynamic range systems is actually good for our learning and development as a photographer. 

Every once in a while, I get into a conversation with someone who says we no longer need grads, and is looking forward to the release of some new camera that claims to have more dynamic range than the current models available.

Fjallabak-Sept-2017-(10).jpg


I'd like to put forward the argument that having less dynamic range is a good thing and that working with limitations is a good thing, indeed, I feel it has been of great benefit for me to work within the narrow confines of a film that typically has a DR range between 3 and 5 stops.

My reasoning for this is this: In my experience, good light tends to be soft light, and soft light tends to have a low dynamic range. Also, by working in a narrower band of light, you start to really 'see' more, and notice tonal responses in the landscape that won't work for you. In essence, you become more aware and also more selective about what you shoot. This, in my opinion can only be a good thing, as photography is really the art of learning to 'see'.

I've learned a lot about light because I had to figure out how to get all the tones of a scene into a limited dynamic range. I've had to go through the pain of shooting in crap light and getting my images home and realising they looked a lot worse than images shot in soft light.

I can fully appreciate that wanting to have a wider DR available would allow us to shoot more scenes, but I'm not convinced that those other scenes will be better. There is a reason after all why we tend to shoot during the golden hours and during overcast days: the light is soft and it tends to render more pleasing tonal graduations. Being able to work with a wide dynamic range may mean you can shoot more, but I'm not convinced the resulting work will be pleasing.

Perhaps the real issue at hand is this: we want to be able to shoot anything, at any time, the way we want.

I have always come at photography from the point that it is a life-long journey in learning to 'see' and finding out where the technical boundaries are, and how best to work within them. There will always be technical boundaries.

For me, I'm happy with my limited range film. I've often found great experiences are learned from working at the boundaries of any medium and I've often found limitations make me work better too. Working with a narrow band of light has taught me a great deal about which tones I can shoot and at what times it may be possible to do so, and under which kinds of light conditions. It has given me a sense of clarity and of focus to my work.

Because of this, I now specialise, rather than try to be a master of many things. My process is simpler: less choice means less decisions, and therefore, a clearer picture of where it is that I want to go.

Improvements in photographic skill are done in small steps. We need to notice changes, and for this to happen, we need the changes to happen in manageable bites for our mind to digest.

Learning what good light is does not come from having a flexible system that can handle all kinds of light. This kind of system encourages us to be lazy. Instead, we have to do the work, and earn the knowledge.